
Overview
The Medeek Wall Plugin is a parametric wall modeling extension for SketchUp that enables users to create, edit, and regenerate framed wall assemblies and their related sub-assemblies.
Installation
The recent versions of SketchUp allow you to install zipped Ruby files or extensions (.rbz) directly within SketchUp.
To install the Medeek Wall extension (.rbz file format) within SketchUp 2017, 2018, 2019, 2020, 2021, 2022, 2023, 2024, 2025, 2026:
- Login into your computer as an admin before installing any Ruby scripts. This will make the installation go more smoothly and ensure that files get installed in the proper places.
- Within SketchUp select Window > Extension Manager (Microsoft Windows) or SketchUp > Extension Manager (Mac OS X). The Extension Manager dialog box is displayed.
- Click on the Install Extension button. The Open dialog box is displayed.
- Locate the Ruby zip file to install (.rbz).
- Click on the Open button. SketchUp will install the extension and display a security prompt.
- The extension will display a prompt for your extension serial number (default value is "TRIAL") if this is a new installation.
- The Medeek Wall extension will now appear in the list of available extensions.
- Re-start SketchUp to enable the license and serial number and save the settings to the registry or .plist files on Mac.
Licensing
If you have previously installed the trial version of the extension and are upgrading to the fully licensed version, it is not necessary to re-install the extension. To activate the full version of the extension:
- Click on the Global Settings icon (three slider bars). The Global Settings menu is displayed.
- Click on the License tab within the Global Settings. The License tab menu is displayed with an input box for your serial number.
- Enter your serial number (case sensitive) and then click the Save Settings button at the bottom of the menu. A popup message will appear confirming your license registration and the Medeek Seal will be displayed.
- Restart SketchUp for the license activation to fully take effect.
For a new installation, the extension will prompt for a serial number during setup. Enter TRIAL to run the trial version, or enter your purchased serial number to enable the fully licensed version.
Interface
Menus/Toolbars
The Medeek Wall plugin includes a number of toolbars and menu groups that organize the primary drawing, editing, and configuration tools used within the extension.
Some menu items may display tools that are still under construction or planned for future releases.
Primary Toolbar
The current Medeek Wall primary menu has eight icons or sub-menus:
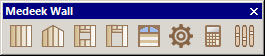
The available items are as follows:
- Draw Wall:
- Int-Ext
- Int-Int
- Ext-Ext (Under Construction)
- Draw Gable Wall (Gable, Shed):
- Int-Ext
- Int-Int
- Ext-Ext (Under Construction)
- Draw Window:
- Rectangle
- Half Round
- Arch
- Gothic Arch
- Oval/Round
- Octagon
- Draw Door:
- Rectangle
- Arch
- Draw Garage Door:
- Rectangle
- Arch
- Dutch Corners
- Engineering Calculations:
- (Under Construction)
- Estimating: (Moved to the Medeek Project Extension)
- CSV Export (MS Excel)
- Wall: Studs, Plates, Sheathing, Cladding, Gypsum, Windows, Doors, Garage Doors, Columns
- Roof Truss: Sheathing, Drip Edge, Hip & Ridge
- Foundation: Concrete, Rebar, Anchor Bolts
- (Other Items Under Construction)
- Change Global Settings:
- Section 1:
- General
- Layers
- Materials [Custom Material Library, SKM Import]
- Sheathing
- Walls
- Doors
- Windows
- Wall Corners
- Trim
- Insulation
- Holdowns
- License
- Section 2:
- Garage Doors
- Headers [Custom Header Library]
- Beams
- Columns
- Posts
- Stairs
- SSW
- Shearwalls (Under Construction)
- Estimating (Under Construction)
- Engineering (Under Construction)
- Updates
- Section 1:
Medeek Wall Tools Toolbar
Medeek Wall Tools is included within the extension and has a menu with eleven icons or functions:

The available items are as follows:
- Move Opening
- Edit Opening
- Delete Opening
- Open/Close [Garage Doors, Man Doors, Windows]
- Move Wall
- Edit Wall
- Split Wall
- Join Wall
- Stretch Wall
- Copy Wall
- Edit Dimensions
Medeek Wall Tools II Toolbar
The Medeek Wall Tools II Toolbar has six icons or functions:
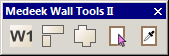
The available items are as follows:
- Number Walls
- Edit Corners
- Draw Wall Perimeter
- Opening Tool
- Copy Opening
- Connect Corners (ADDED - 05/04/2025)
Shear/Strong-Wall Toolbar
The Shear/Strong-Wall Toolbar has four icons or functions:
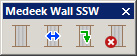
The available items are as follows:
- Draw SSW
- Move SSW
- Edit SSW
- Delete SSW
Beams/Columns Toolbar
The Beams/Columns Toolbar has eight icons or functions:
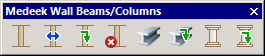
The available items are as follows:
- Draw Column
- Move Column
- Edit Column
- Delete Column
- Draw Beam
- Edit Beam
- Draw Post
- Edit Post
Stairs Toolbar
The Stairs Toolbar has two icons or functions:

The available items are as follows:
- Draw Stairs
- Edit Stairs
Blocking/Molding Toolbar
The Blocking/Molding Toolbar has four icons or functions:

The available items are as follows:
- Draw Blocking
- Edit Blocking
- Delete Blocking
- Draw Molding
Shear Wall Toolbar
The Shear Wall Toolbar has five icons or functions:

The available items are as follows:
- Draw Shearwall (Rectangular Walls Only)
- Move Shearwall (Rectangular Walls Only)
- Edit Shearwall (Rectangular Walls Only)
- Delete Shearwall (Rectangular Walls Only)
- Shearwall Schedule
Context Menu for Walls
When you right click on a Medeek Wall panel the following items will appear in the context menu:
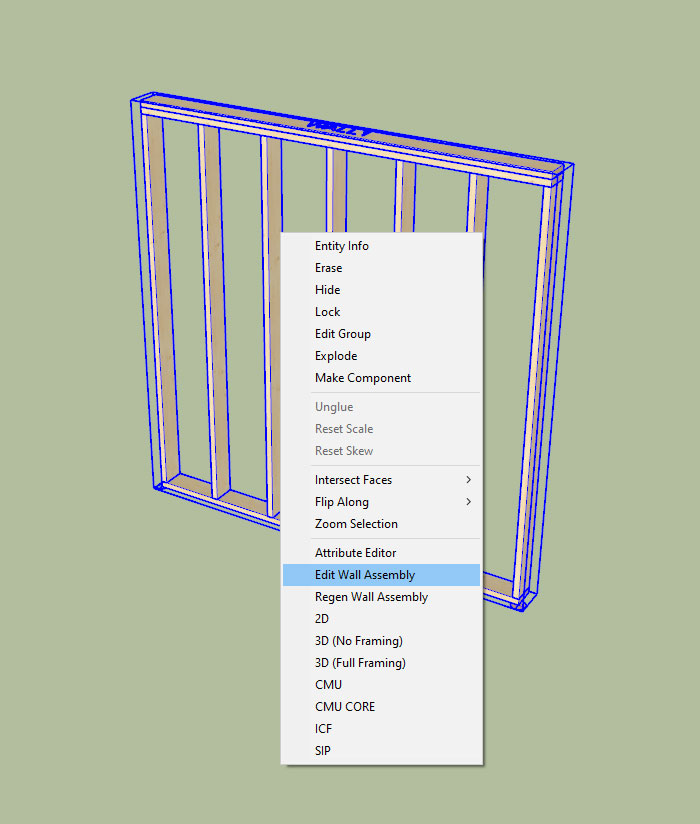
By selecting one of these context menu items further actions or modifications can be made to the selected wall panel. Details for each context item is given below:
- Edit Wall Assembly: Opens the Edit Wall menu which allows you to further modify or customize the wall panel. See the Draw Wall Menu section below for further details.
- Regen Wall Assembly: Regenerates the wall assembly/panel. When a wall regenerates all of its geometry is recreated from scratch thereby making the wall assemblies fully parametric.
- 2D: Switches the wall assembly to 2D mode and only a basic wall envelope is displayed.
- 3D (No Framing): Switch the wall assembly to simplified 3D mode where all the internal framing is represented as a single solid. However all of the sheathing, cladding, gypsum etc... is drawn as normal.
- 3D (Full Framing): This is the (default) full 3D mode of the extension, everything is drawn within the wall envelope including framing, blocking and insulation.
- CMU: Framing is replaced with a single solid and a CMU texture is applied to that solid. No sheathing, cladding or gypsum is drawn.
- CMU Core: The same as CMU mode however this mode allows for sheathing, cladding and gypsum.
- ICF: Standard framing is replaced with exterior foam insulation followed by concrete and then an interior foam insulation, forming a 3-ply wall sandwich. Sheathing, cladding and gypsum are drawn the same as the 3D mode.
- SIP: Standard framing is replaced with exterior sheathing followied by insulation and then interior sheathing, forming a 3-ply wall sandwich. Sheathing, cladding and gypsum are drawn the same as the 3D mode.
Draw/Edit Wall Menu
The Draw Wall menu (and Edit Wall menu) has many parameters and may appear daunting at first glance, please refer to this guide to help understand what each of these parameters does. Also realize that many parameters can probably be left at their default values as a starting point and only need to be modified if further customization is needed.
To further simplify this large menu each section is presented separately. Note that some of the sub-menus are only displayed when certain advanced options are enabled.
Wall Presets and Basic Options
The ability to save and load presets as well as set basic wall options are found at the top of the menu:

- Preset Name: Selects a saved wall preset. This allows you to quickly load a previously saved wall configuration instead of entering every parameter manually.
- Wall Name: Assigns a user-defined name to the wall preset or wall configuration.
- Wall Family: Sets the wall shape family. Standard options include Rectangular, Gable, Shed, and Hip.
- Wall Type: Defines the wall type and wall line orientation. Common options include Int-Ext, Int-Int, and Ext-Ext.
- Wall Length: Sets the overall wall length.
- Wall Height: Sets the wall height from the top plate to the bottom plate for a standard rectangular wall.
- Wall Header Height: Sets the default header height within the wall framing.
- Stud/Wall Depth: Defines the overall framed wall depth.
- Stud Width: Sets the stud thickness.
- Stud Spacing: Sets the spacing between studs.
- Stud Direction: Controls the layout direction of the stud spacing pattern.
- Stud Spacing Offset: Applies an offset to the stud layout so the stud pattern can be shifted from its default starting position.
- Stud Ply: Sets the number of stud plies. A value of 0 enables the staggered stud options.
- Ext. Stud Depth: When staggered studs are used, sets the exterior stud depth.
- Int. Stud Depth: When staggered studs are used, sets the interior stud depth.
- Top Plate Qty.: Sets the number of top plates.
- Top Plate Thk.: Sets the thickness of each top plate.
- Bottom Plate Qty.: Sets the number of bottom plates.
- Bottom Plate Thk.: Sets the thickness of each bottom plate.
- PT Bottom Plate: Toggles whether the bottom plate is pressure treated.
- Wall Group: Assigns the wall to a wall group name. This parameter is currently not used by any feature(s) of the plugin. Its purpose is TBD.
- Wall Framing: Sets the wall display or construction mode, including framed wall modes and alternate wall systems such as 2D, CMU, CMU CORE, ICF, and SIP.
- Ext. Thickness: For ICF walls, sets the exterior insulation thickness.
- Ext. Insul. Mat.: For ICF walls, sets the exterior insulation material.
- Int. Thickness: For ICF walls, sets the interior insulation thickness.
- Int. Insul. Mat.: For ICF walls, sets the interior insulation material.
- Ext. Thickness: For SIP walls, sets the exterior layer thickness for the sheathing.
- Ext. Sheath Mat.: For SIP walls, sets the exterior sheath material.
- Int. Thickness: For SIP walls, sets the interior layer thickness for the sheathing.
- Int. Sheath Mat.: For SIP walls, sets the interior sheath material.
- Insulation Mat.: For SIP walls, sets the insulation core material.
- Wall Framing Material: Sets the framing material type such as wood, steel, LSL, brick, or none.
- Advanced Wall Options: Toggles the advanced wall options section on or off.
Wall Corner Start and Wall Corner End
The start and end of the wall panel is configured within this menu. Many of these parameters can be left at default values:
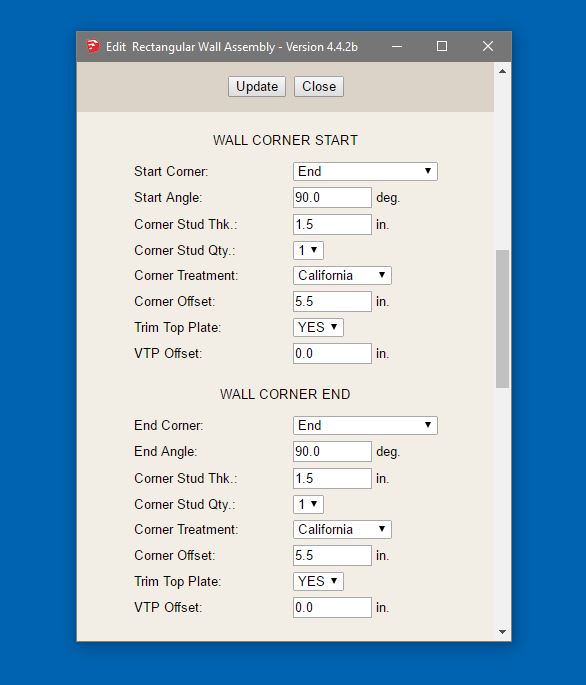
- Start Corner: Sets the corner condition at the beginning of the wall. Options include End, Outside Corner, Inset Outside Corner, Inside Corner, Inset Inside Corner, Tee Corner, and Terminal. When drawing a wall the auto corner configuration will normally set this value, but it can be manually edited.
- Start Angle: Sets the angle of the start corner in degrees. The auto corner configuration normally sets this value.
- Corner Stud Thk.: Sets the thickness of the corner studs at the wall start.
- Corner Stud Qty.: Sets the number of studs used at the selected corner condition.
- Corner Treatment: Sets the framing arrangement used at the corner, such as California, solid stud packs, blocked corners, U-Cal, panel, or none. This setting will override the corner stud quantity parameter when that parameter is set to quantity "1".
- Corner Offset: Offsets the corner condition inward from the start of the wall.
- Trim Top Plate: Toggles trimming of the top plate at that wall start.
- VTP Offset: Sets the very top plate offset at the wall start. Normally this parameter should be left at its default zero value.
- End Corner: Sets the corner condition at the end of the wall using the same corner options available for the start of the wall.
- End Angle: Sets the angle of the end corner in degrees. The auto corner configuration normally sets this value.
- Corner Stud Thk.: Sets the thickness of the corner studs at the wall end.
- Corner Stud Qty.: Sets the number of studs used at the end corner.
- Corner Treatment: Sets the corner framing treatment used at the end corner.
- Corner Offset: Offsets the corner condition inward from the wall end.
- Trim Top Plate: Toggles trimming of the top plate at the wall end.
- VTP Offset: Sets the very top plate offset at the wall end. Normally this parameter should be left at its default zero value.
Wall Advanced Options
Configure the sheathing, cladding and gypsum. Enable additional options which will then toggle the visibility of additional sub-menus:
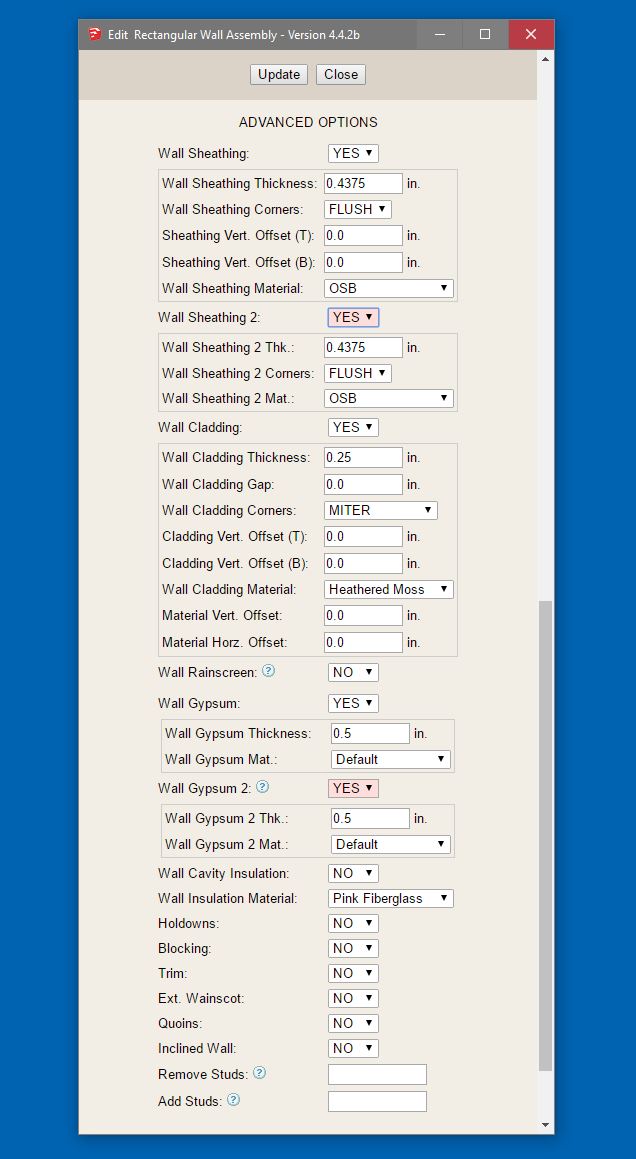
- Wall Sheathing: Toggles the primary exterior wall sheathing on or off.
- Wall Sheathing Thickness: Sets the thickness of the primary sheathing layer.
- Wall Sheathing Corners: Controls how the sheathing wraps corners, typically flush or lapped.
- Sheathing Vert. Offset (T): Sets the vertical offset of the sheathing from the top of the wall.
- Sheathing Vert. Offset (B): Sets the vertical offset of the sheathing from the bottom of the wall.
- Wall Sheathing Material: Sets the sheathing material assigned to the main sheathing layer.
- Wall Sheathing 2: Toggles a second sheathing layer on or off.
- Wall Sheathing 2 Thk.: Sets the thickness of the second sheathing layer.
- Wall Sheathing 2 Corners: Controls the corner condition for the second sheathing layer.
- Wall Sheathing 2 Mat.: Sets the material assigned to the second sheathing layer.
- Wall Cladding: Toggles the exterior cladding layer on or off.
- Wall Cladding Thickness: Sets the cladding thickness.
- Wall Cladding Gap: Sets the cladding stand-off or gap from the layer beneath.
- Wall Cladding Corners: Controls how cladding returns at corners.
- Cladding Vert. Offset (T): Sets the top vertical offset of the cladding.
- Cladding Vert. Offset (B): Sets the bottom vertical offset of the cladding.
- Wall Cladding Material: Sets the cladding material assigned to the wall exterior finish.
- Material Vert. Offset: Sets the vertical material texture offset for the cladding.
- Material Horz. Offset: Sets the horizontal material texture offset for the cladding.
- Wall Rainscreen: Toggles rainscreen furring on or off. The depth is controlled by the wall cladding gap parameter.
- Furring Width: Sets the width of the rainscreen furring members.
- Furring Spacing: Sets the spacing between rainscreen furring members.
- Furring Offset: Sets an offset for the furring layout.
- Furring Dir.: Sets the furring orientation or direction.
- Furring Top Size: Sets the size of the top furring member.
- Furring Btm Size: Sets the size of the bottom furring member.
- Wall Gypsum: Toggles the primary gypsum layer on or off.
- Wall Gypsum Thickness: Sets the thickness of the primary gypsum layer.
- Wall Gypsum Mat.: Sets the material assigned to the primary gypsum layer.
- Wall Gypsum 2: Toggles a second gypsum or outside gypsum/cladding layer on or off.
- Wall Gypsum 2 Thk.: Sets the thickness of the second gypsum layer.
- Wall Gypsum 2 Mat.: Sets the material assigned to the second gypsum layer.
- Wall Cavity Insulation: Toggles cavity insulation within the wall framing.
- Wall Insulation Material: Sets the cavity insulation material.
- Holdowns: Toggles the holdown options sub-menu on or off.
- Blocking: Toggles the blocking options sub-menu on or off.
- Trim: Toggles the wall trim options sub-menu on or off.
- Ext. Wainscot: Toggles the exterior wainscot options sub-menu on or off.
- Quoins: Toggles the quoin options sub-menu on or off.
- Inclined Wall: Toggles the inclined wall options sub-menu on or off.
- Remove Studs: Allows specific studs to be removed by entering stud numbers separated by commas. Enter studs (stud number) to remove deliminated by commas. Do not enter spaces into string.
- Add Studs: Allows additional studs to be inserted by entering custom stud labels and x-position values. Enter stud label followed by a colon and then the x-position value. Deliminate stud key/value pairs from each other with commas. Do not enter spaces into string.
Holdwon and Blocking Options
Configure holdowns at each end of the wall panel. Insert rows of blocking at standard intervals:
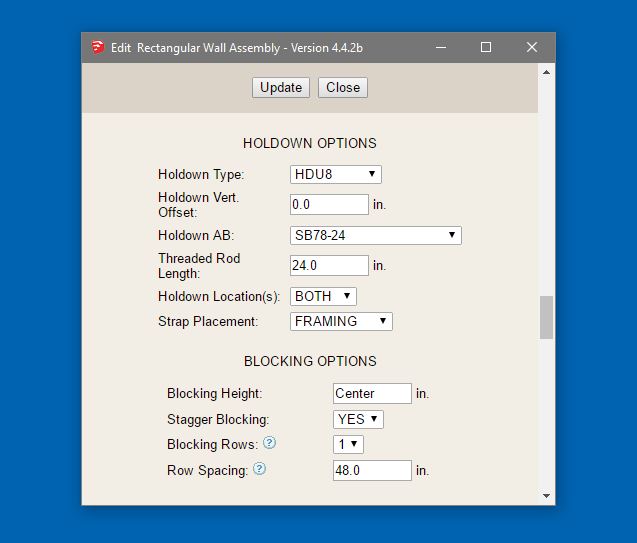
- Holdown Type: Selects the holdown hardware model to use.
- Holdown Vert. Offset: Sets the vertical offset of the holdown hardware.
- Holdown AB: Selects the anchor bolt or anchor hardware associated with the holdown. Some options include a threaded rod extension.
- Threaded Rod Length: Sets the threaded rod length when a threaded rod configuration is used.
- Holdown Location(s): Controls whether holdowns are placed at both ends of the wall, only the start, or only the end.
- Strap Placement: Controls whether the holdown strap is placed relative to the framing or sheathing.
- Blocking Height: Sets the elevation of the first row of blocking.
- Stagger Blocking: Toggles staggered blocking layout on or off.
- Blocking Rows: Sets the number of rows of blocking to install. Additional rows are arrayed above the first row.
- Row Spacing: Sets the vertical spacing between blocking rows.
Wall Trim Options
Install exterior trim including: Outside Corner Trim, Interior Corner Trim, Band Board, Frieze Board, and Skirt Board:

- Trim Location: Controls whether trim is located on the sheathing or on the cladding.
- Trim Thickness: Sets the thickness of the trim boards.
- Outside Corner Trim: Toggles outside corner trim on or off.
- Outside Trim Width: Sets the width of the outside corner trim.
- Inside Corner Trim: Toggles inside corner trim on or off.
- Inside Trim Width: Sets the width of the inside corner trim.
- Wainscot Cut: Controls whether the trim is cut around the wainscot condition.
- Band Board: Toggles the band board on or off.
- Band Board Width: Sets the width of the band board.
- Band Board Thk.: Sets the thickness of the band board.
- Band thru Corners: Controls whether the band board continues through corners.
- Band Board Hgt.: Sets the height of the band board location on the wall.
- Frieze Board: Toggles the frieze board on or off.
- Frieze Board Width: Sets the width of the frieze board.
- Frieze Board Thk.: Sets the thickness of the frieze board.
- Frieze thru Corners: Controls whether the frieze board continues through corners.
- Skirt Board: Toggles the skirt board on or off.
- Skirt Board Width: Sets the width of the skirt board.
- Skirt Board Thk.: Sets the thickness of the skirt board.
- Skirt thru Corners: Controls whether the skirt board continues through corners.
- Drip Cap (Skirt): Toggles a drip cap above the skirt board.
- Drip Cap Height: Sets the height of the drip cap.
- Drip Cap Depth: Sets the depth or projection of the drip cap.
- Wall Trim Material: Sets the material assigned to the trim assembly.
Exterior Wainscot, Quoin and Inclined Wall Options, Annotations
Configure wainscot options for the wall. Install quoins at the wall corners (outside corners only). Setup an inclined bottom plate for the wall:
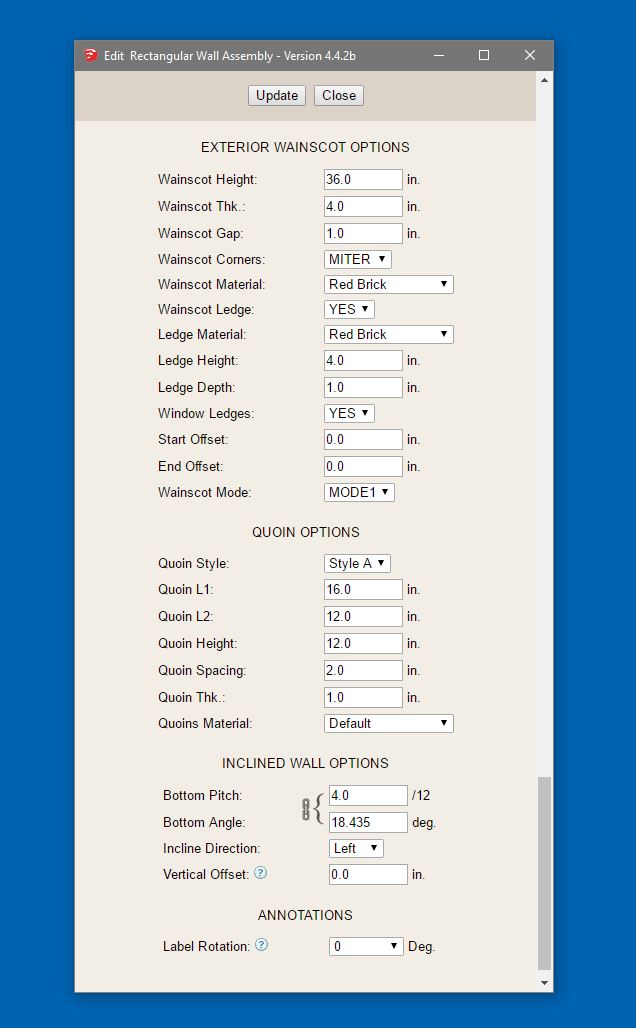
- Wainscot Height: Sets the height of the exterior wainscot.
- Wainscot Thk.: Sets the thickness of the wainscot layer.
- Wainscot Gap: Sets the stand-off or gap for the wainscot layer.
- Wainscot Corners: Controls how the wainscot returns at wall corners.
- Wainscot Material: Sets the material assigned to the wainscot finish.
- Wainscot Ledge: Toggles a horizontal ledge or cap at the top of the wainscot.
- Ledge Material: Sets the material assigned to the ledge.
- Ledge Height: Sets the height of the ledge profile.
- Ledge Depth: Sets the projection depth of the ledge.
- Window Ledges: Toggles whether ledges are also created at window locations.
- Start Offset: Sets the start offset distance for the wainscot from the beginning of the wall.
- End Offset: Sets the end offset distance for the wainscot from the end of the wall.
- Wainscot Mode: Sets the wainscot layout mode.
- Quoin Style: Selects the quoin style configuration.
- Quoin L1: Sets the first quoin length dimension.
- Quoin L2: Sets the second quoin length dimension.
- Quoin Height: Sets the height of each quoin piece.
- Quoin Spacing: Sets the spacing between quoin pieces.
- Quoin Thk.: Sets the thickness or projection of the quoins.
- Quoins Material: Sets the material assigned to the quoins.
- Bottom Pitch: Sets the pitch of the inclined bottom plate.
- Bottom Angle: Sets the angle of the inclined bottom plate in degrees.
- Incline Direction: Sets the direction of the incline, left or right.
- Vertical Offset: Offsets the inclined condition up or down from the bottom of the wall.
- Label Rotation: Rotates all labels and annotations of the wall panel.
Wall Types
Explain the available wall types, such as exterior/interior wall behavior, reference lines, orientation rules, and how walls connect at corners and intersections.
Wall Families
Add descriptions for Rectangular, Gable, Shed, Hip, and any other supported wall families, including when to use each family.
Drawing Walls
Explain the process of drawing walls, including snapping, inference behavior, draw order recommendations, and plan layout strategy.
Editing Walls
Document how walls are moved, edited, regenerated, and updated after changing wall parameters or adjoining geometry.
Windows
Describe how windows are inserted, configured, trimmed, and modified, including geometry options and installation settings.
Doors
Describe how doors are inserted, configured, trimmed, cased, and edited within wall assemblies.
Garage Doors
Document garage door creation, install styles, trim/casing options, animation options, and related settings.
Columns
Describe how columns are placed inside wall assemblies, including types, sizes, ply counts, rotation, and height settings.
Framing
Explain framing options such as studs, plates, headers, king/jack studs, cripple studs, and advanced framing settings.
Shear Walls
Document shear wall tools, panel behavior, sheathing, holdowns, and engineering-related modeling options where applicable.
Materials & Layers
Explain how materials, tags/layers, and component organization are managed within the plugin.
Regeneration
Describe when regeneration is needed, how it affects openings and sub-assemblies, and best practices for rebuilding models safely.
Attributes
Add a user-facing explanation of stored attributes, how they relate to plugin settings, and where users can find more technical reference material.
Tips
Collect practical modeling advice, recommended workflows, and known best practices for efficient wall modeling.
Troubleshooting
Add common issues, error scenarios, licensing problems, geometry conflicts, and regeneration troubleshooting steps.
Version Notes
Track major changes in the manual and important plugin milestones so the manual can evolve with the plugin.