News:

SMF - Just Installed!

Main Menu
Menu

Show posts

This section allows you to view all posts made by this member. Note that you can only see posts made in areas you currently have access to.

Show posts Menu

Messages - Medeek

#2176
This post was prompted by some comments made on the other board regarding wall justification and cladding materials.  I think this is important enough that I duplicate my response here as well. 

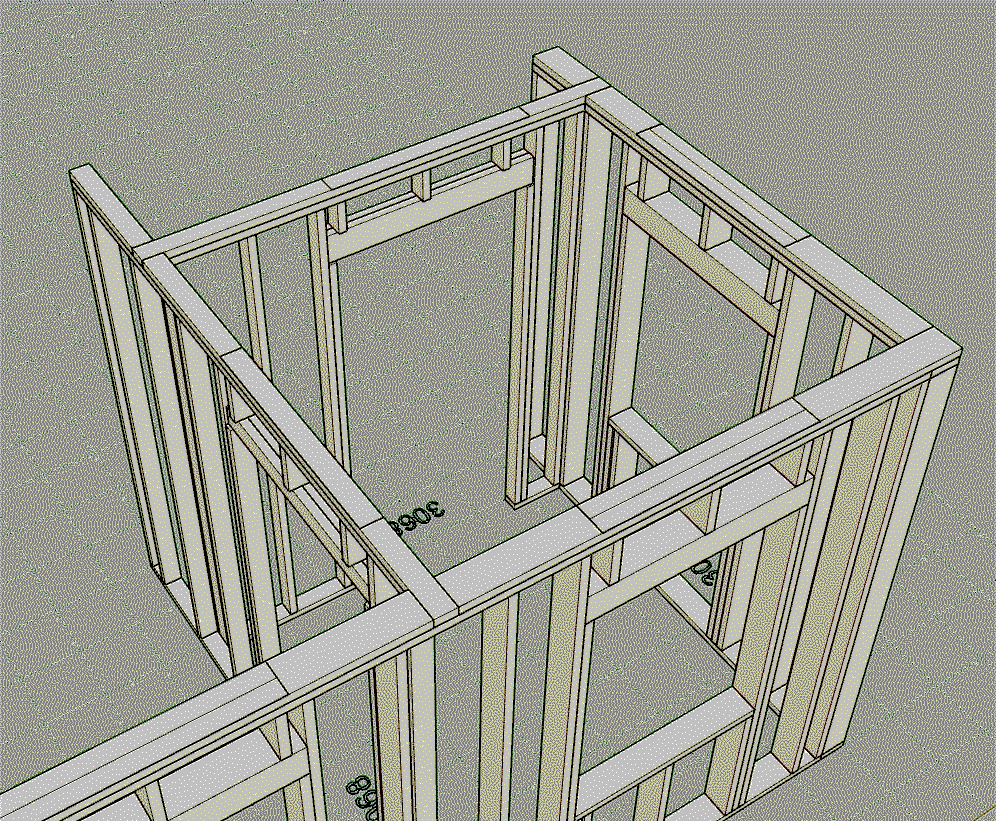
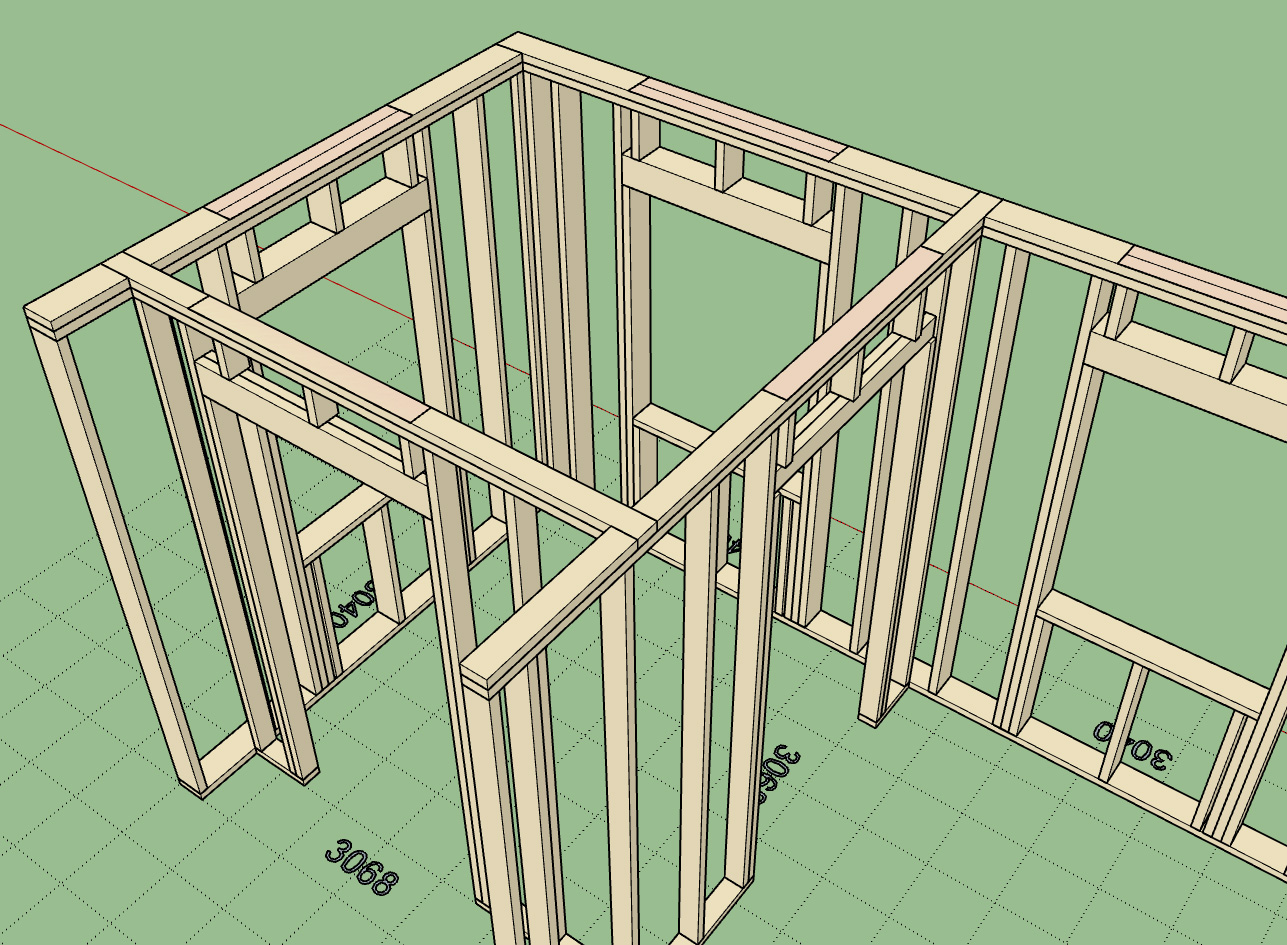
1.)  The wall justification (front, middle, back) is something I have been treating as a basic property or parameter of the wall.  This morning as I really put on my thinking cap I came to the realization that this is not so.  The justification is only really needed during the wall creation process and once the wall is created there is no justification, the wall just is.

With that being said I need to rework the wall creation tool slightly, it shouldn't be too big of an issue but will require some serious and careful thought.  For now please only use the "FRONT" justification, the other two options are flawed by their very nature.

This may take me a couple days to fully think this through and come up with the correct solution.  Please have patience with me while I work this one out, I need to do it slowly and carefully and get it right.

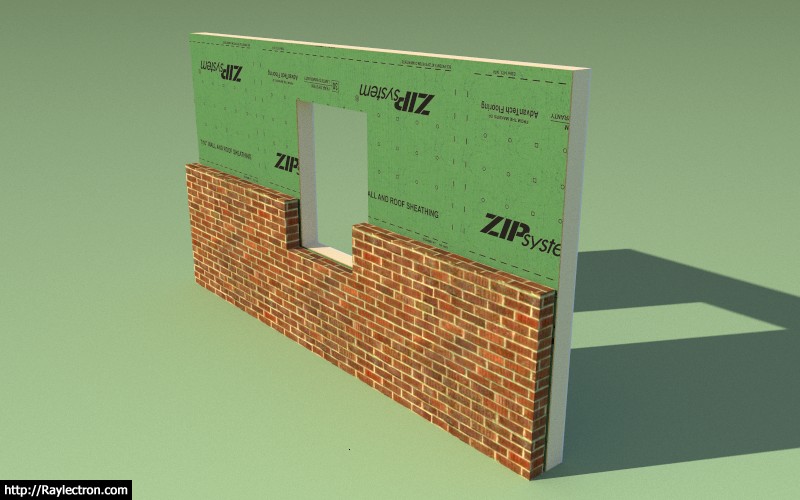
2.)  I am not satisfied with the current system of applying materials to the wall assembly via the plugin.  Since the plugin completely rebuilds the entire wall panel on any edit or addition of windows or doors it must somehow save the material being used for each element (group) within the attribute library.  It is already setup to do this and works quite well. 

One can also use the edit menu to select from a static list of materials. 

I think a few things could help to make this better:
A.)  The plugin can look at the currently defined materials in the model and give the user the ability to select from any of these materials as well as the hard coded materials within the wall edit menu.

B.) Perhaps and observer or something should be setup so that if the user manually opens up the wall assembly group and assigns a material to the cladding, sheathing or gypsum for a given wall panel this information is then updated within the attribute library.

C.) Provide an interface within the global settings where additional hard coded materials can be added to the existing ones.  The user would upload an image, assign a name and specify the X and Y scaling.
#2177
Looking at garage doors this morning and I have my ideas on how one should trim these out but I am wondering if the rest of community is inline with my thinking.

Feel free to email me or post on the board a garage door jamb detail/section on how you would like these put together.

I'm also going to add in an advanced framing menu for the garage door option wherein the user can specify the parameters for portal framing the opening, however I may not attack this one until later since there are much bigger fires to put out at the moment.
#2178
June 2018 -  Medeek Wall Plugin Promotion

In order to help kick off the new Medeek Wall Plugin I will be running a promotion from June 1 thru June 15.

All orders of the Wall Plugin will also include a free two year license of the Truss Plugin ($50 value) and a free one year license of the Foundation Plugin ($25 value).

If you have previously purchased either of these other plugins then your serial expiration date for each plugin will be extended by the time periods given above.

To take advantage of this offer, once you have purchased the wall plugin, simply email me with your client ID or username and that you would like to take advantage of the June 2018 Promo.

For clients that have already purchased the Wall Plugin, you can also take advantage of this offer by emailing me directly as above and I will add the Truss Plugin and Foundation Plugin to your client account or extend your serials as mentioned above.

This offer is only good until June 15, 2018.  All Medeek Wall Plugin orders made on June 16, 2018 (PST) or later will not be eligible for this time limited offer.
#2179
Version 0.7.5 - 05.31.2018
- Fixed a bug with the callout positioning method to allow for the correct placement of wall opening text.
- Intersecting walls now cut through the top plate of the primary walls at tee intersections.
- Wall cladding and sheathing materials option now added to wall creation tool.
- Default behavior for the Wall Mode parameter added the Walls tab of the global settings (Line or Polyline).
- Added DensGlass™ sheathing material to the sheathing tab of the global settings.
- Began the addition of tooltips to every parameter within the global settings.
#2180
When you delete walls the cutouts on the the top plates are left as you can see in the image below, but a rebuilt of the wall will heal those unnecessary cutouts:

#2181
The tee intersection algorithm has been revamped and is now properly cutting out top plates when walls intersect at these intersections:


When a wall gets rebuilt (ie. edited, moved, opening added, or switched between modes) the tee intersection algorithm is run and any intersecting walls will be detected (any walls that are touching the wall in question and have a "tee corner" configuration at that end). 

What this means is that if you manually move an intersecting wall and slide it along the main wall and then rebuild the main wall the top plate will automatically update with the correct cut out as shown above.
#2182
I've already rolled out two revisions since the initial beta release.  Please download, uninstall the older version of the plugin and then install the most current version. 

I've seen some issues with corrupt installations where a newer version is installed on an older version.  You need to uninstall the plugin first before upgrading, that is the safe bet.

Also please check the changelog so you are aware of the updates, even though I do post each update on the board:

http://design.medeek.com/resources/wallpluginchangelog.html

I am still noticing a lot of people sending in comments that they are unable to get materials applied when they have not enabled the auto material assignment in the materials tab of the global settings.

I think what I am going to do is have the plugin set this particular setting to "ON" as the initial default behavior rather than "OFF".  I will make this change live with the next release.
#2183
Here is a good example of a stucco structure with a cultured stone wainscot:


Notice the stucco trim just above the wainscoting and then the ledge of stone that projects beyond the wainscoting just below it. 

The additional parameters for a two cladding exterior system (wainscoting) would be:

Exterior Wall Wainscoting: YES/NO
Wainscoting Thickness: in./mm
Wainscoting Air Gap: in./mm
Wainscoting Corners:  Flush/Lap/Miter/Return
Wainscoting Material: Brick/Culture Stone etc...

Wainscoting Height:  in./mm
Wainscoting Ledge/Trim: YES/NO
Ledge Height:  in./mm
Ledge Depth:  in./mm

Also in the Trim Tab another couple of parameters for the Exterior Trim option above the wainscoting:

Wainscoting Trim:  YES/NO
Wainscoting Trim Width:  in./mm

Also notice how the stucco trim around the window and doors meets the wainscoting trim and terminates there. 

Why can't you designers and architects keep things simple, I'm going to have to jump through some hoops to code all of this. :)
#2184
Just when I think I'm starting to figure this thing out it gets a little more complicated.

Take for instance the wall below with the exterior stone wainscoting:


Typically we see stone or brick with a siding or stucco product above it.

So instead of a single type of cladding and cladding thickness on the wall we might have two different types on the same wall panel.

The brick or stone might be up to the windows or even somewhere mid height as shown below:


Any thoughts on this type of construction, preferences or further complicating factors?

I think I basically need to allow for more complicated cladding scenarios.

With brick you often see a rowlock course at the transition:

#2185
Version 0.7.4 - 05.29.2018
- Fixed a bug with the wall polyline tool so that the wall line will snap to the X or Y axis.
- Added ZIP Systems(c) 7/16" and 1/2" wall sheathing materials to the sheathing tab of the global settings.
- Added the Z Height option to the wall creation tools. The Z height parameter and option to enable this feature are found in the walls tab of the global settings.
- Created icons and added toolbars for the Simpson Strong-Wall module and the Columns module, both of which are still under construction.
#2186
Two things I should state before further testing:

1.)  Please click on the global settings, visit each tab, familiarize yourself with the various options, turn on layers, materials etc...  I have had a number of questions about why the plugin does not keep the materials assigned to it.  Realize that any manual edits to the wall assembly (group) will be eliminated  once you make any modifications to the wall with the plugin, it has to rebuild the entire assembly from scratch in order to capture any changes made to it, otherwise it cannot be fully parametric and editable. The downside to being fully parametric is that the plugin has full control of the assembly.  If you need manual edits to live with a wall then you have to  place that geometry outside of the wall assembly group, if you place them inside they will be erased on a rebuild. There may be some workaround for this in the future but I haven't quite got that far yet.

Each wall assembly (group) has a fairly extensive library of attributes that are essentially a database for the wall panel.  Every aspect of the wall assembly is defined by a parameter in this database.  The wall panel can be rebuilt from scratch just from this dataset.  The 3D model generated by the plugin  is simply a geometric manifestation of the dataset stored in the attribute library.

2.)  If you have a specific bug to report, please if possible, include any error codes generated within the ruby console.  Without these codes I am running blind and merely guessing in some cases.  Some of the issues I've seen today I am unable to duplicate on my machine so I can't fully address them.  The error codes are critical to my debugging process and ultimately correcting any issues that may exist.  Of course this may not apply to functional types issues involving UI behavior or specific feature requests, I do recognize that.
#2187
Version 2.1.9 - 05.27.2018
- Replaced the 64 bit SketchUp check in the installation module to fix an incompatibility issue with SketchUp 2014.
- Added additional wall cladding materials in the sheathing tab of the global settings.
- Fixed a bug in the top level assembly method of the roof truss module.
#2188
Toolbar Menus and Icons for the upcoming Columns and Simpson Strong-Wall modules:


With the Strong-Walls the plan is to offer both the steel and the wood varieties.
#2189
Version 0.7.3 - 05.27.2018
- Fixed a bug which limited window height to only 48 inches.
#2190
Lets start with the columns:

I will need a new Wall Column Toolbar with the following icons and functions:

- Draw Column
- Move Column
- Edit Column
- Delete Column

The possible parameters for the column will be:

Column Name:  Set by Plugin, not user definable (COLUMN1, COLUMN2, COLUMN3 etc...)
Column Location:  Distance from origin of Wall
Column Size:  (2) 2x6, (3) 2x6,  4x6, 6x6, 6x8 6x12, LSL3.5x7.25 etc...
Column Height:  Measured from base of wall (default would be FULL which would make it the same height as the studs in the wall.  A height less than the wall height would create a beam pocket arrangement with two king studs next to the column.
Beam Pocket King Studs:  This option only applies in the situation where there is a beam pocket, NONE, 1, 2, 3.
Vertical Offset (Bottom):  Allow the column to project below the bottom plate so that it can bear more directly on foundation below, see window wall below.  Default value would be zero which would frame it flush with the bottom of the rest of the wall studs.

Here is a window wall I detailed out a couple of year ago, notice the PSL column running the full height of the wall.  One could argue they are not columns but actually the king studs next to the windows, I agree that is a bit of a grey area.  Also  notice the use of the Simpson Wood Strong-Walls, cut to suite for the raked wall and the beam pocket for the central glulam beam that bear on the window header.  Note that this detail is not complete since a number of callouts are missing, probably a screen shot about halfway through the detailing.

It would be nice if the wall plugin were capable of handling a window wall such as this, with stacked windows, columns, beam pockets (that can interact with windows and doors below) and Simpson Strong-Walls.