News:

SMF - Just Installed!

Main Menu
Menu

Show posts

This section allows you to view all posts made by this member. Note that you can only see posts made in areas you currently have access to.

Show posts Menu

Messages - Medeek

#1636
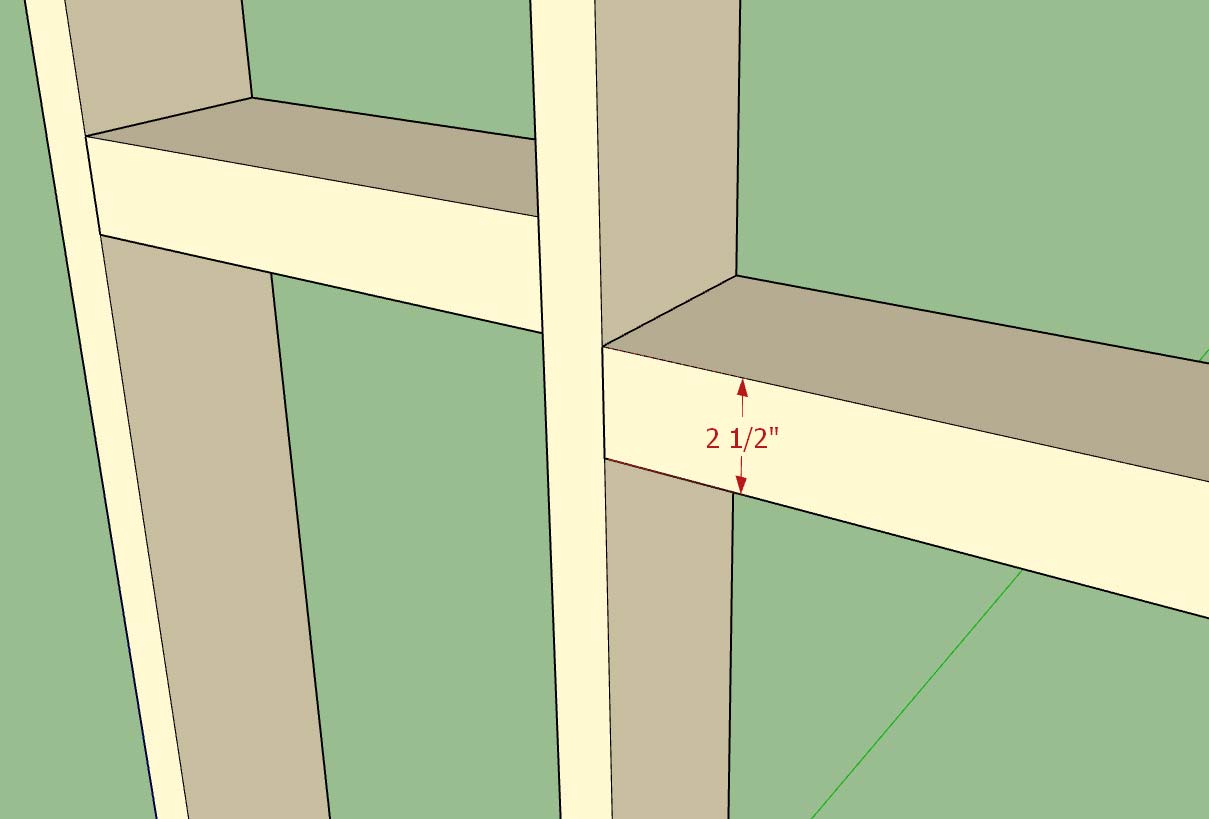
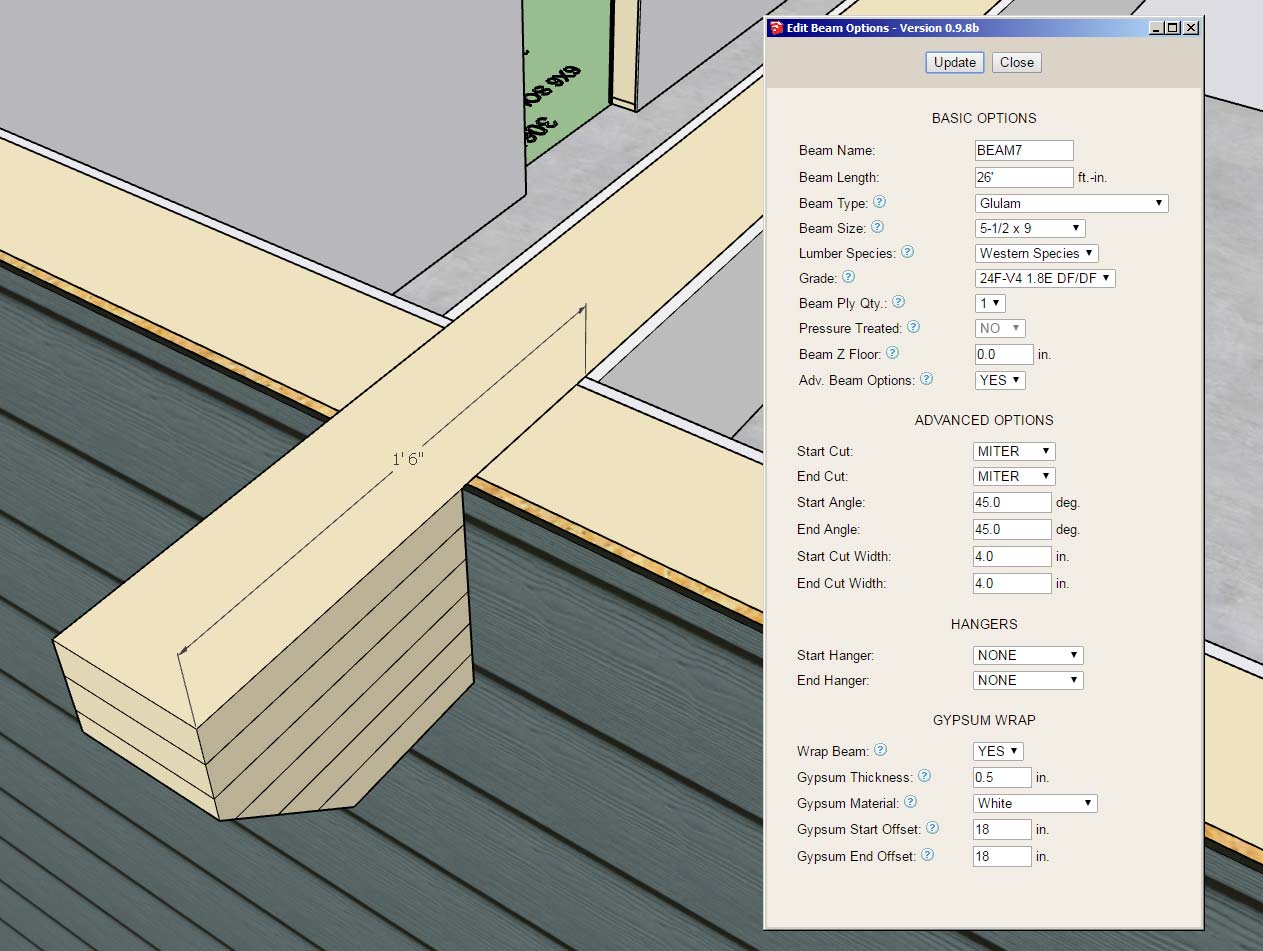
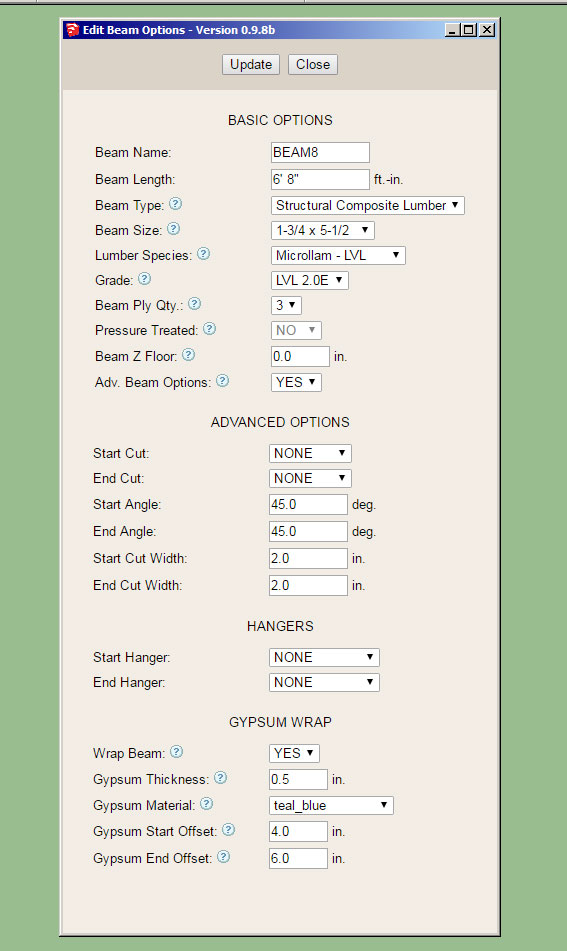
As a follow up discussion to the multi-story tutorial I was asked a question by a designer regarding installation of a band board between the two stories as shown below:


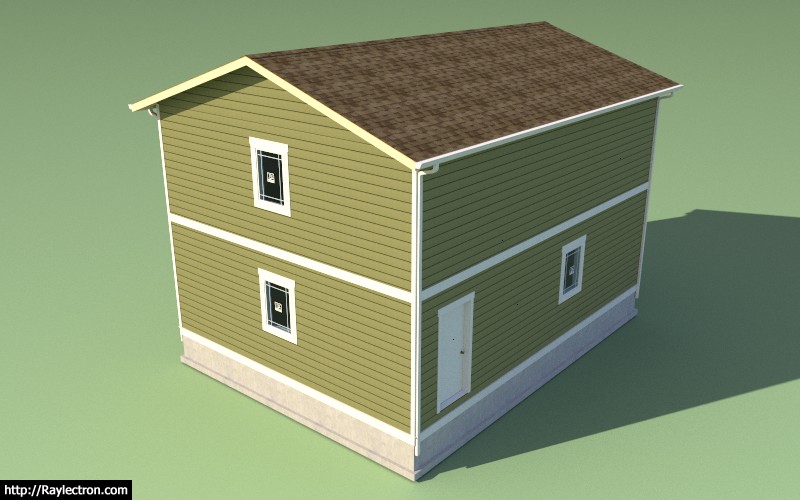
To be honest I hadn't tried this before but the band board is provided by the 1st level walls and then its height is actually set such that it is actually above the sheathing, cladding and wall height.  It seems this is possible.

On the same token one could use the 2nd story walls to specify the band board and input a negative number to set the band board below the actual wall itself.

In this particular design case, there is more than one way to solve the problem.

The frieze and skirt boards are a little more static, in that they will always be positioned at the top and bottom of cladding respectively.

On a slightly different note you will notice that we are already at revision "h" of version 0.9.8:

http://design.medeek.com/resources/wallpluginchangelog.html

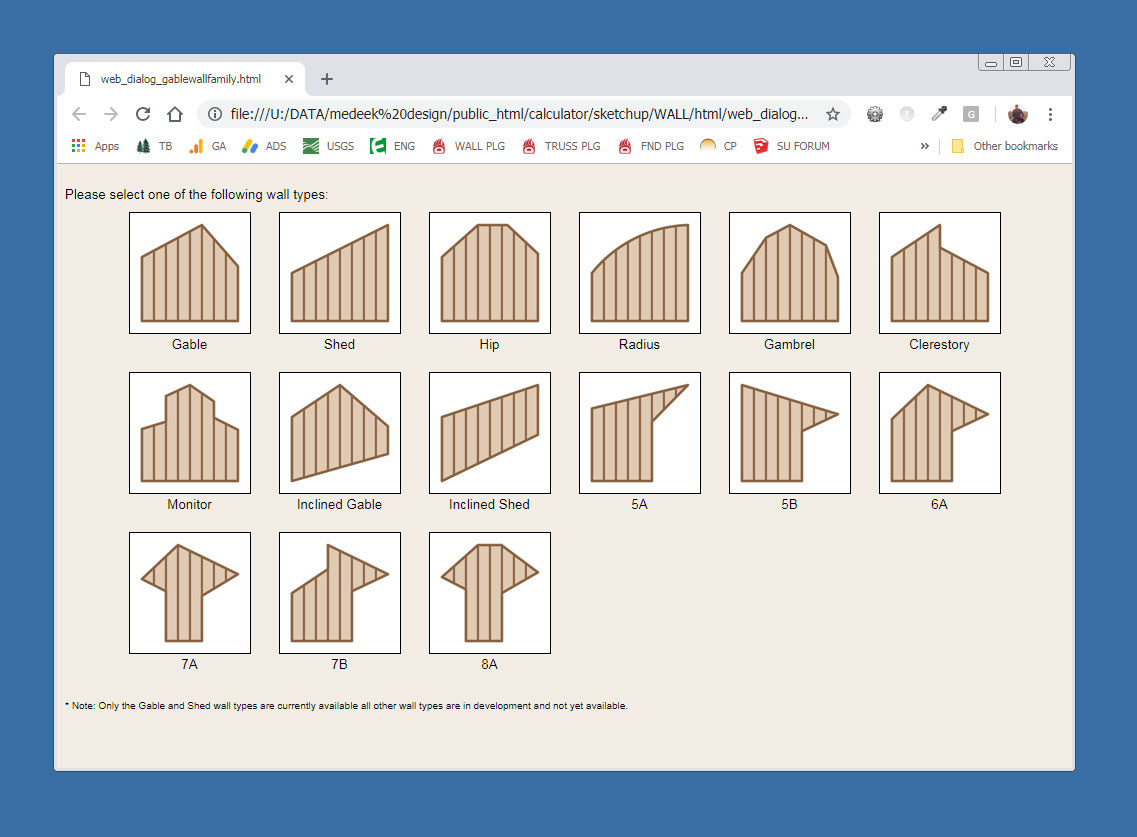
Quite a few updates to this version.  The reason I haven't rolled to 0.9.9 is because I am saving that version for the stair module roll out and then version 1.0.0 will be when I roll out the gable wall module.

At that point I will be taking the plugin out of BETA which in all reality means that I am then paying attention to backward compatibility issues and actively trying to maintain it so that new upgrades do not cause problems. 

Version 1.0.0 also means that I will be further reviewing my pricing structure and my licensing system.  There has been some pressure from various quarters to move to a subscription based licensing system even though I have resisted this move.

If I do move to a subscription system the good news is that all currently licensed users will be grandfathered in so that they will not be required to renew a yearly subscription, their licenses will always remain permanent. 

As an incentive to encourage more early adopters I will be running a "Thanksgiving" promotion on all of the plugins until Nov. 23 (Black Friday).  For all plugins purchased between Oct. 15 thru Nov. 15 your typical two year license will be doubled to four years and your one year foundation plugin will be doubled to two years.

For those who have recently purchased any of the plugins please send me an email and I will honor this promotion by extending your license exp. date.
#1637
Version 0.9.8h - 10.25.2018
- Fixed a bug with the blocking parameter for metric templates.

If your using metric templates you will want to upgrade to this version otherwise your blocking will appear too large as it will not be converted from millimetres to inches in the final drawing step.

A critical fix for clients using metric.
#1639
Version 0.9.8g - 10.24.2018
- Corrected a bug in the Walls tab of the global settings involving the wall presets selection field.
- Added a blocking thickness parameter in the Walls tab of the global settings.


This particular bug in the Walls tab only became an issue when a previously selected default preset was deleted and then the user navigated to the Walls tab after the deletion. 

Now the javascript checks first for the existence of the default preset before trying to assign it in the drop down menu.

Not a really big issue but in a certain state it will lock up the form and not allow the user to save their settings.

The blocking thickness parameter was a quick item to add per a user request.  Note that this is a global default and cannot currently be adjusted per wall panel.  If we need more granularity I can do that but it means an additional parameter in the attribute library of the wall panel which means it will break backward compatibility with previous versions of the plugin.
#1640
Version 0.9.8f - 10.23.2018
- Critical fixes in the following modules: Auto-Corner Config, Shutters, Sheathing and Cladding.
- Loading wall presets changed to a two step process.  Clicking the update button is no longer required to activate a loaded preset.
- Wall edit menu updated to allow for sequential selection of wall panels for quick editing.

There are even more minor fixes that are too numerous to list.

The wall edit menu update should be a welcome fix.  If you are right clicking on each wall to edit them then each time you right click and "Edit Assembly" the wall settings will appear in the edit menu for that wall.  Previously a separate window would open up for each wall panel but only the last edit window actually worked. This resolves that issue and makes it more intuitive and robust.

If you are using the edit icon to edit walls this is even a quicker method of selecting and editing walls.  After you select a wall the tool remains active and you can continue to select and update walls by clicking on your target wall panels.  To terminate the tool, close the edit menu and hit the space bar.

Both methods of editing are now faster and much more intuitive and robust. 

Now I just need to do the same thing for editing windows and doors, beams etc...
#1641
In the global settings I am calling the (three) layers that I use for labels and annotations "Dimension" layers.

Technically this isn't quite correct since I am not placing dimensions on this layer rather annotations, text and labels as well as some symbols (windows, doors, holdowns, straps etc...)

What would be a better name to give these layers?
#1642
Putting a few fires out this morning and a couple things jumped out at me:

1.)  In your wall preset names keep it simple.  Best practice is to stick with simple alpha numeric names.  Using double quotes appears to cause some issues with the javascript of the HTML menu and will cause the presets not to load.  Spaces and periods are okay.

2.)  Just a reminder that loading and using a preset is a three step process (this needs to be streamlined into a two step process).  Select the preset from the drop down menu, load the preset (click the load button) and then activate the newly loaded values with the update button (click the update button).  Then begin to draw.

3.)  Inserting the wall groups within other groups essentially hides them from the plugin.  The auto-corner config module is looking for wall panel groups in the root of the model.  It does not check inside of other groups and look for nested wall panel groups.  If you place wall panel groups within other groups it will essentially ignore these walls, it doesn't know they exist.
#1643
This weekend was one of those deals where life kind of got in the way.  Busing kids to prom and taking my two youngest to breakfast at McD's, not exactly a breakfast for champions but a good time none the less.

I did manage to put out a few small fires and take care of some items that were a bit lower on the list. 

I'll hit it hard again tomorrow, really excited to get the first iteration of the gable wall out.
#1644
Version 0.9.8e - 10.21.2018
- Added a manufacturer's label and fields (mfr. and series) for windows.
- Added the following window manufacturers and labels: Alside, Andersen, Atrium, Harvey, Integrity, Jeld-Wen, Marvin, MI, Milgard, Pella, PGT, PlyGem, Simonton, YKK-AP
- Shutters Option added to the Windows tab of the global settings.
- "Window Trim Inset" parameter added to the Windows tab of the global settings.

The Window Trim Inset parameter allows the trim to be brought right up against the window.  Previously the trim around the window was flush with the framed opening however since the window is typically 1/2" less in overall size than the framed opening this left a 1/4" gap all the way around the window.

The default value for the inset parameter is 1/4" so that the trim butts right up to the window frame.  This parameter can be set to a positive or negative value. If the parameter is set to zero then the trim will be flush with the framed opening.

The shutter option parameter allows one to set the default behavior of this advanced option for the window draw tool.

The manufacturer series parameter has been added however I have not yet added all the series for each manufacturer.  I will be contacting each manufacturer and inquiring which of their window series should be added to the plugin.

#1645
Per user requests I've enabled an additional parameter for windows so that you can assign a manufacturer to the installed windows (door also coming soon).  Note that the window geometry itself is not manufacturer specific but is controlled by the users preferences.

In the near future I will also be creating a window and door preset feature so various options can be pre-configured.

If manufacturer's logos are enabled in the Material tab of the Global Settings and a manufacturer is assigned then the plugin will affix a label to the window in order to quickly and easily identify the window manufacturer:


The label is actually its own group/face on the dimension 3 layer and can be toggled by turning this layer on or off.

In the future it might be useful to enable a tool that allows one to switch all of the windows and door from one manufacturer to another with the single click of a button.  If a cost database is setup for the various manufacturers then the estimating module can create comparative cost estimates depending on the manufacture of the fenestration.

I've initially added the following manufacturers/brands:

Pella, Milgard, Marvin, Integrity, Plygem, Jeld-Wen, Alside, Andersen, Atrium, Harvey, MI, PGT, Simonton, YKK-AP


The label is constrained to a square 8"x8" and offsets the window glass by 0.125 so that it does not z-fight with the window glass.

Please send me any window and door manufacturers that you would like to see added to the plugin.
#1646
This screenshot shows an application where the gypsum offset comes into play:


Note the 18" offset from the end of the beam. Also note the use of the miter cut and the notching out of the gypsum, sheathing and cladding (advanced options for the column with beam pocket).

Surprisingly there is quite a lot going on here even though the geometry looks relatively simple.
#1647
Version 0.9.8d - 10.18.2018
- Created the gable wall matrix selector for the new gable wall module.
- Added the ability to wrap beams with gypsum and updated the beam menus with this new feature.

*** WARNING ***

This update will break backward compatibility for beams created in previous versions of the plugin.


Note that the material used to wrap the beams can be chosen from the custom materials so technically any material can utilized.

The start offset and end offset allow the designer to pull back the wrap any specified amount to allow for beam pocketing or in the case where the beam extends beyond the wall to the exterior of the building.

The wrap covers the sides and bottom of the beam.  Thickness can also be specified as shown above.
#1648
As I was going down through the list this morning and my notes I've also noticed that there has been quite a demand for multiple layer gypsum walls (firewalls).

To do this I would need to create a new attribute library folder which basically means that this would break backward compatibility of the plugin again.

Under the advanced options I would add in a new parameter called:

Advanced Gypsum Options:  Yes or No

Then under a new heading:

Advanced Gypsum Options:

Interior Layers:  0, 1, 2
Int. 1 Thickness:  in or mm
Int. 1 Material:  (utilize materials from Material Manager as well as one default built in material)
Int. 2 Thickness:  in or mm
Int. 2 Material:  (utilize materials from Material Manager as well as one default built in material)

Exterior Layers:  0, 1, 2
Ext. 1 Thickness:  in or mm
Ext. 1 Material:  (utilize materials from Material Manager as well as one default built in material)
Ext. 2 Thickness:  in or mm
Ext. 2 Material:  (utilize materials from Material Manager as well as one default built in material)

A total of eleven new parameters.  Let me know your thoughts on this, is there a better way to present these options or somehow condense this information into a simpler form?

Since the user can specify the material independently for each layer (4 different layers) its possible to use other materials other than gypsum (ie. tile, cement board, OSB, Plywood, cedar paneling etc...)

For example one could install a layer of foam under a layer of gypsum or OSB under the gypsum or any other possible combination.
#1649
Affiliate Program Announcement:

I am actively looking for affiliates to help promote the plugin(s).  I have already setup an affiliate system for the Wall Plugin within my billing system.

For those of you who have a website or some other means of marketing and would be interested in providing a link (to the plugins) on your website or by some other means, please feel free to contact me at nathan@medeek.com or 425-652-4188.

#1650
Here is a first look at the gable wall matrix:


The rabbit hole is going to get really deep.  I am initially concentrating on the standard gable wall and then onto the shed wall.

Some of these wall types will also require a mirrored version (just another parameter in the wall menus).

Note, that a triangular wall is nothing more than a degenerate gable wall where the wall height is zero at the start and end of the wall.  A shed wall with the lower wall set to zero height is a right triangle.  The same sort of logic can be applied to all the other various wall heights shown.

Things get a little interesting when you start moving these type of walls or walls that are adjacent to these walls (attached at the corners).  Each wall type may require its own special auto-corner configuration algorithms.  As long as I keep things modular all of this complexity shouldn't be too big of a problem.