News:

SMF - Just Installed!

Main Menu
Menu

Show posts

This section allows you to view all posts made by this member. Note that you can only see posts made in areas you currently have access to.

Show posts Menu

Messages - Medeek

#2116
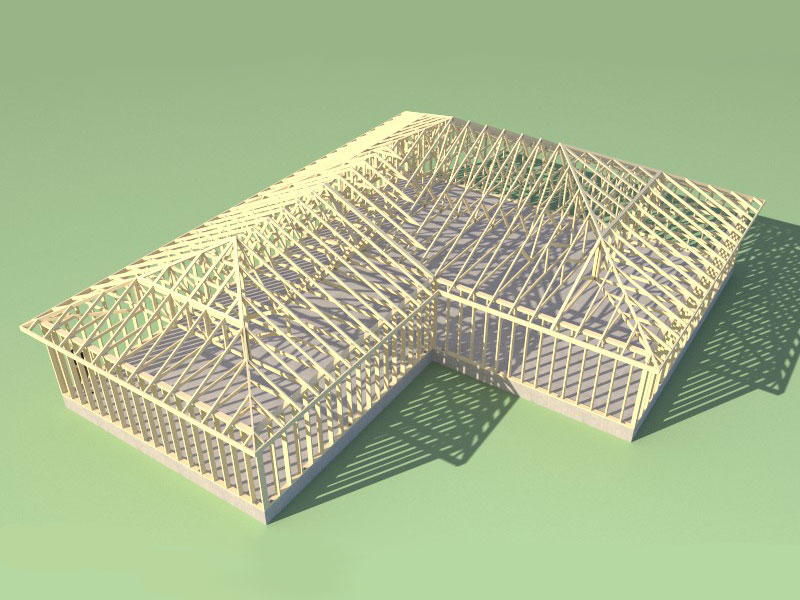
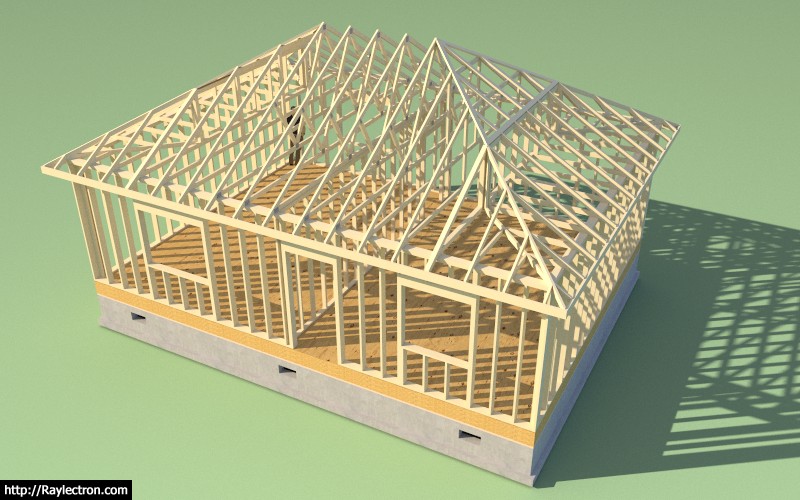
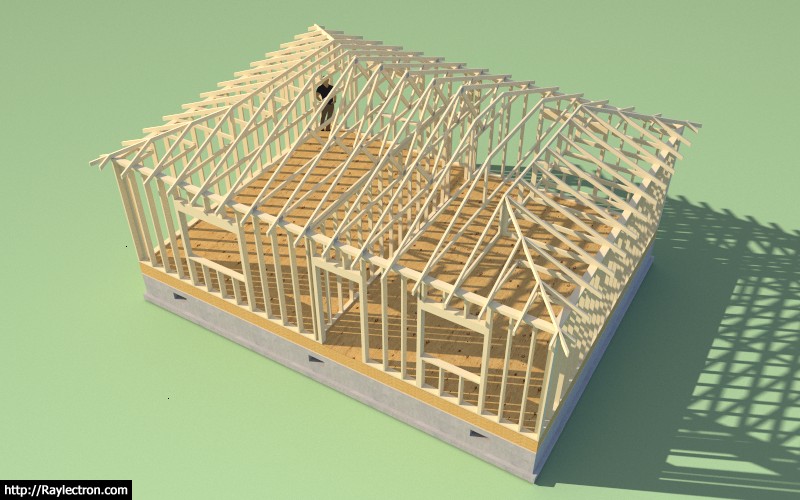
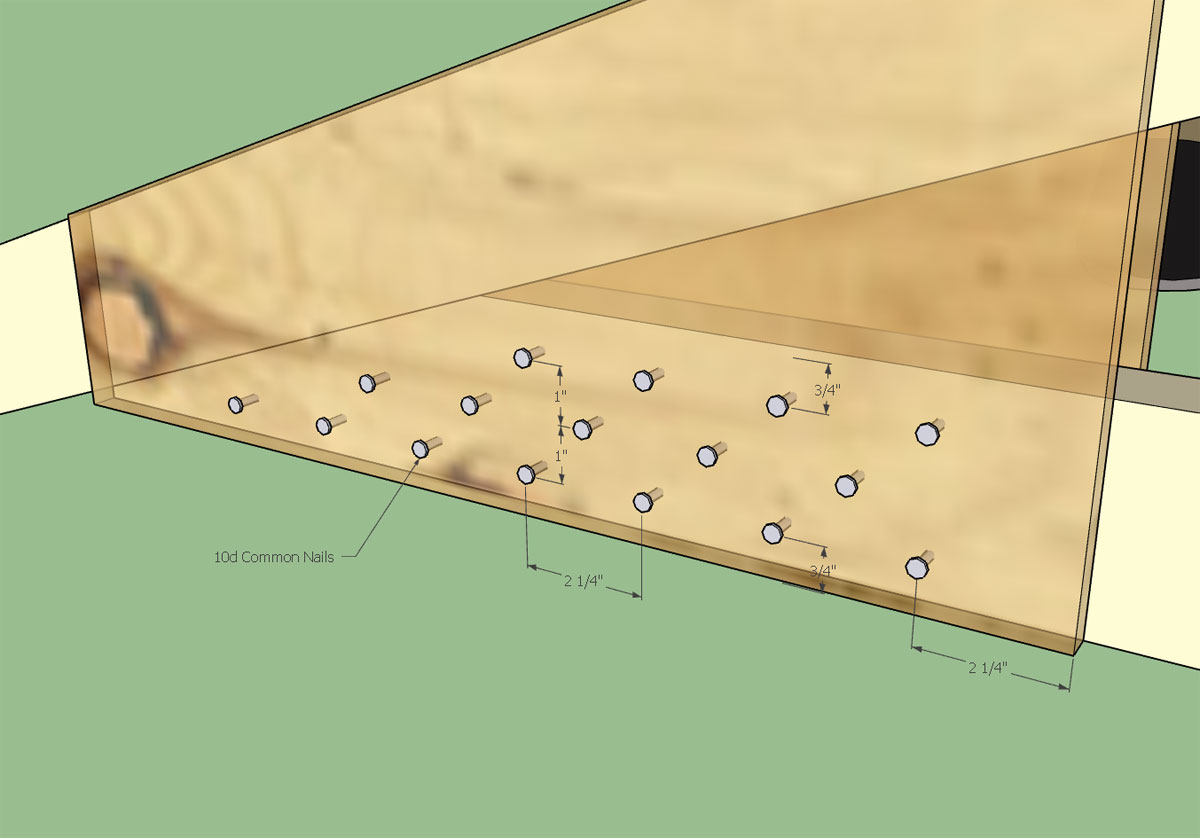
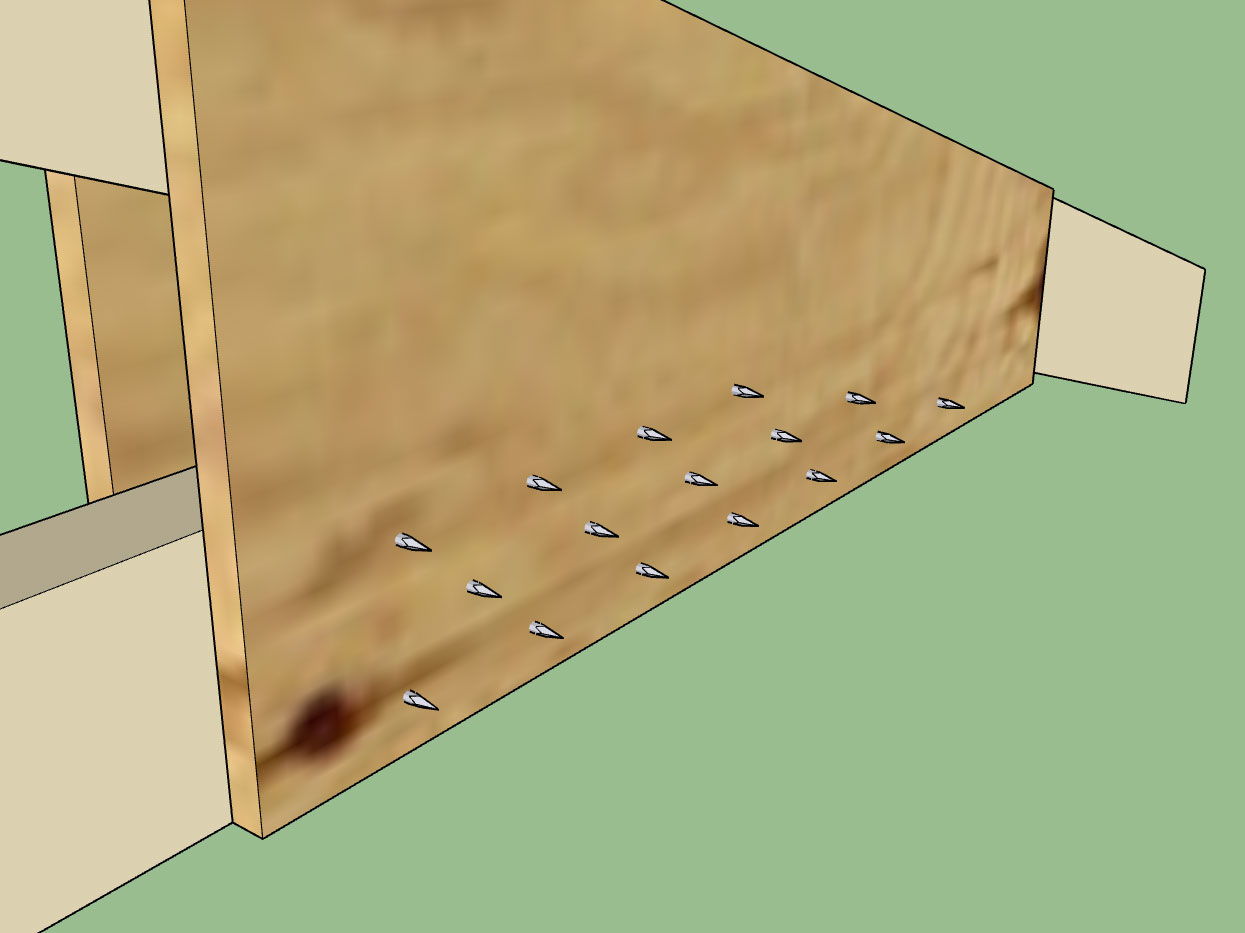
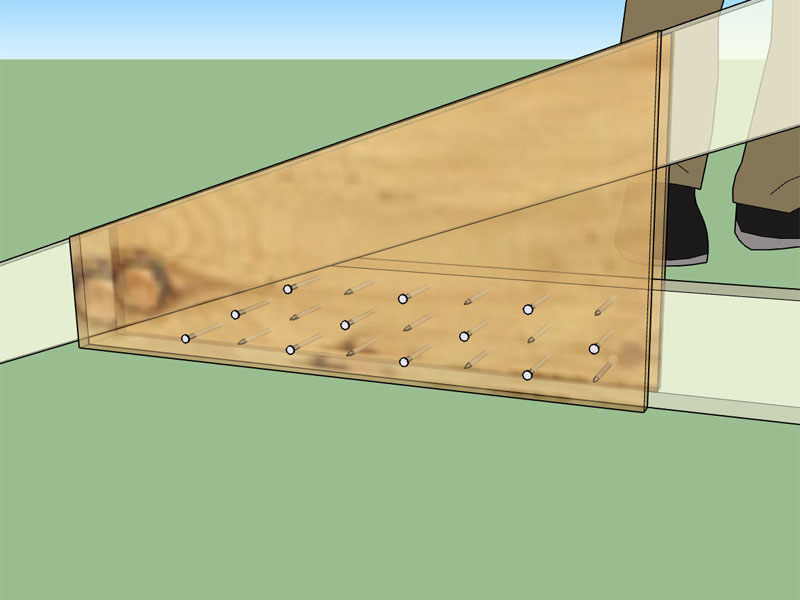
Added energy/raised heels for stepdown hip set (3 variants: wedge, slider and vertical w/ strut).


View model here:

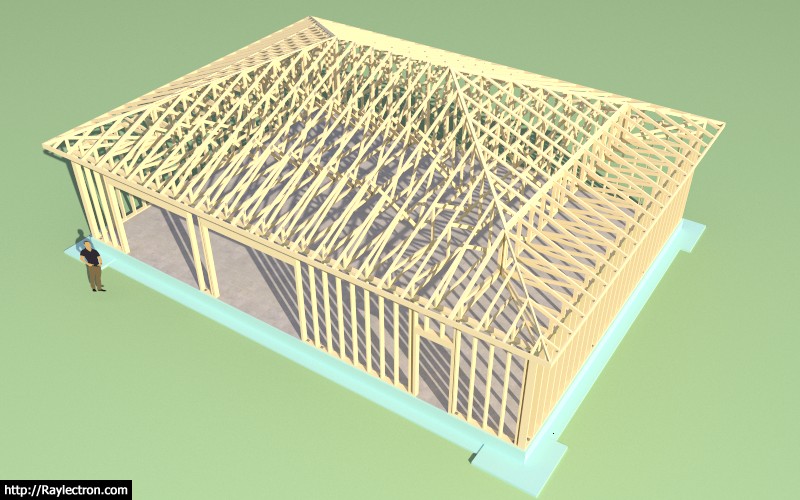
https://3dwarehouse.sketchup.com/model/5e38b8eb-5c4d-4e05-a48e-63ceee60652b/Commercial-Building-with-Hip-Roof

Now the possibilities are limitless since you can match the heel height of any other roof (ie. rafter, TJI etc...)

Adding in this feature was not as bad I thought it would be but each truss type in the set must be considered and dealt with separately:

- Common Trusses
- Hip Trusses
- End Jacks
- Hip Jacks
- Corner Jacks
#2117
I was working on the hip sets last summer before my neck injury took me out so I'm glad to finally get back to it and at least get one variant knocked out. 

I probably should have gotten on to it in January but I was still not feeling 100% so I been only tackling the easy stuff and chipping at those one by one.

I still have all the other variants to complete as well as raised heels, then the plates.

Timber trusses with bolted connector plates is on my hot list as is completion of the attic and gambrel attic trusses.

My full todo list for the plugin is at least two pages of hand written notes so there is plenty more to do.

The holy grail would be to have the plugin convert any complex roof outline (face) into a full truss or rafter roof without any manual editing, that is my target.
#2118
It was pointed out that stick framing the valley set is often preferred in some locales (ie. California).  This is an example of a "California Fill".

I've seen them done this way up here in Washington but probably not as often.


I haven't shown the vertical studs and their pads only the sleepers, rafters and ridgeboard are shown, view model here:

https://3dwarehouse.sketchup.com/model/fa645631-ede6-41c9-bbf4-74092fd8ea7a/Hip-Roof-10

Where the Fill connects back to the other roof do I have that correct?  Do you install another rafter against the truss?

Notice that I did not bevel the 2x12 sleeper, just shifted it so that if lines up correctly with the roof plane, of course if this is mounted on top of the sheathing then the position will change accordingly.

Those double bevel cuts on the rafters would scare me, but then again I'm no carpenter.

Funny how everything has a "California" in front of it:

- California Corner (Ext. Wall Corner) http://design.medeek.com/resources/framing/FRAMING_CORNERS.pdf
- California Fill
- California Hip Set https://3dwarehouse.sketchup.com/model/97644895-c988-435c-bdc4-c7b8956a6d46/California-Hip-Set-Rev-2

I guess the Californians are innovators.
#2119
Using the stepdown truss set as a primitive it is possible to generate some fairly complex roofs:


In this case I created two hip sets and then tied them together with a valley set.  View model here:

https://3dwarehouse.sketchup.com/model/1cd3ccf1-e7f8-492c-b4d0-f12286a6ba8e/Hip-Roof-9

This one way to do it but the more typical way would be to further customize the larger hip set so as to eliminate the valley set entirely.

Interesting how the larger girder truss ties into the smaller girder truss (3 ply).  The smaller girder truss would need to be beefed up to handle this point load if there is no bearing wall below, and then the point loads from the posts supporting the girder truss (in wall) would probably need spread footings. 

A few seconds to create the basic geometry and then about 10 minutes of trimming (with the trim function) and manual adjustments.  I can see that the truncated hip set feature would be nice to have where hip roofs are tying into other roofs, similar to what I have enabled for the gable truss tool.
#2120
Version 1.9.2 - 06.24.2017
- Added Stepdown hip set trusses.
- Enabled advanced options for stepdown hip sets.
#2121
The complexity of the hip truss sets makes them a bit of pain to program but when its all said and done it is a thing of beauty. 

Once I have the stepdown hip set well on its way it will not be to difficult to enable the other styles of truss hip sets.  The only one that is significantly different is the terminal hip set and the dutch hip set but even those will fall into place relatively easily.

Once I get all of the hip sets configured I'm half tempted to bump my price another $10, would that be too much of a stretch?  I'm already at $30 for the plugin and I would like to keep it within reach of even the casual user.
#2122
Advanced options are now configured: fascia, sheathing, cladding, gypsum, ceiling battens.

Girder trusses can be single or double ply, I can add more plies if requested.

I've also added the option to use a drop-in purlin frame, see image and model below:


View model here:

https://3dwarehouse.sketchup.com/model/f313c80f-fbe0-4a45-a086-6914319f3b26/Medeek-Office-Hip-Roof

Items still needing attention:

- Error check in metric mode.
- Internal webs for hip trusses
- Internal web algorithm for end and hip jack trusses.
- Raised heels
- Enable soffit cut for jack trusses and hip trusses.
- Enable plates for hip, jack and drop-in purlin.
- Setup the half-a-hip option (one end is a gable end).
#2123
The stepdown hip truss set is mostly finished.  I probably have a couple more days of work setting up raised heels, internal web algorithms, and advanced options.

#2124
Spent some time Sunday night and yesterday evening working on the stepdown hip truss set.  Given the shear number of trusses involved in one of the these assemblies I'm figuring it will be the rest of the week before I will see the light at the end of the tunnel, but progress is steady.
#2125
If you compare the capacity of a single shear and double shear connection in most cases you get double the capacity, see results for a 10D nail into DF and Structural 1 Plywood below:


So returning to our previous example we now have 2180.9lbs/176.3lbs = 12.4 => 13 fasteners in double shear, rather than 25 fasteners in single shear, a much more reasonable number of fasteners
#2126
Nailing from both sides is not reasonable in my opinion, there is no way to line up the nails easily from one side to the other, better to just nail from one side which bring me back to nails in double shear. 

Using a 10d common nail (.148 x 3) and with 1/2" of protruding nail to clinch I get this layout:


with the backside looking something like this:


I probably don't need a 2.25" end distance (15D) on the plate edge toward the inside of the truss but I am using Table C11.1.6.6 from the NDS Commentary (NDS 2012).
#2127
I've been thinking about site built trusses some more and trying to apply some rational thought to how best to nail together a WGC truss.  If you consider nails in single shear, 8d nails spaced at 4" between fasteners with a row spacing of 1" and and end spacing of 1.5" you end up with something like this.


Those are 8d common nails so they aren't very big but spaced at 2" between nails in a row I would be afraid of splitting that bottom chord. 

Looking at this I'm fairly convinced that going with longer nails that are in double shear and clinched give more bang for the buck, allow less nails and thereby less chance of splitting the truss members.  Thoughts?
#2128
Lightweight version of a Simpson Strong-Tie HDU8 Holdown.

View model here:

https://3dwarehouse.sketchup.com/model/ce77385b-5873-48b1-ba1a-a37c2ac58294/HDU8

Its about 1/10th the weight of the official holdown in the 3D Warehouse and 118 polygons vs. 3,109 polygons. 

I will plan on using these lightweight versions in the upcoming wall and structural plugin.

If you overlay the simplified version on top of the official version you will see how closely they match up.  The critical dimensions are primarily accounted for.
#2129
Version 1.1.4 - 06.11.2017
- Added pre-drawn face outline tool for stemwall and slab-on-grade foundations and slabs.

You can now click on a face (any closed polygon shape) and the plugin will generate the appropriate stemwall, SOG or slab.
#2130
Just for the record the algorithm to size and position the mid top chord to web plate (Plate 2) is a real piece of work:

gamma2 = 3.14159265358979 * 0.5 - @Phi
length2 = @Pldim2 * 0.5 -1
p3x = @Swx4 + length2 * (cos(@Theta2) / cos(gamma2 - @Theta2))
p3y = @Swy4 - length2 * (sin(@Theta2) / cos(gamma2 - @Theta2))
p2x = p3x - (@Tcd + length2) * cos(gamma2)
p2y = p3y + (@Tcd + length2) * sin(gamma2)
p1x = p2x - @Pldim2 * cos(@Phi)
p1y = p2y - @Pldim2 * sin(@Phi)
length4 = sqrt((@Strx4 - p1x)*(@Strx4 - p1x) + (@Stry4 - p1y)*(@Stry4 - p1y))
zeta2 = atan((p1y - @Stry4)/(@Strx4 - p1x))
length3 = length4 * sin(zeta2 + @Theta3) / sin(3.14159265358979 * 0.5 + @Phi - @Theta3)
p4x = p1x + length3 * cos(gamma2)
p4y = p1y - length3 * sin(gamma2)

if @Theta2 > gamma2
  p2x = p3x - ((@Tcd + length2) / (cos(@Theta2 - gamma2))) * cos(@Theta2)
  p2y = p3y + ((@Tcd + length2) / (cos(@Theta2 - gamma2))) * sin(@Theta2)
end


Actually had to use the Sine Law:  https://en.wikipedia.org/wiki/Law_of_sines

Its funny because my 15 year old daughter just covered trigonometry in her math class and she told me she would never use this stuff so why learn it.