News:

SMF - Just Installed!

Main Menu
Menu

Show posts

This section allows you to view all posts made by this member. Note that you can only see posts made in areas you currently have access to.

Show posts Menu

Messages - Medeek

#2266
Version 1.7.7 - 12.31.2016
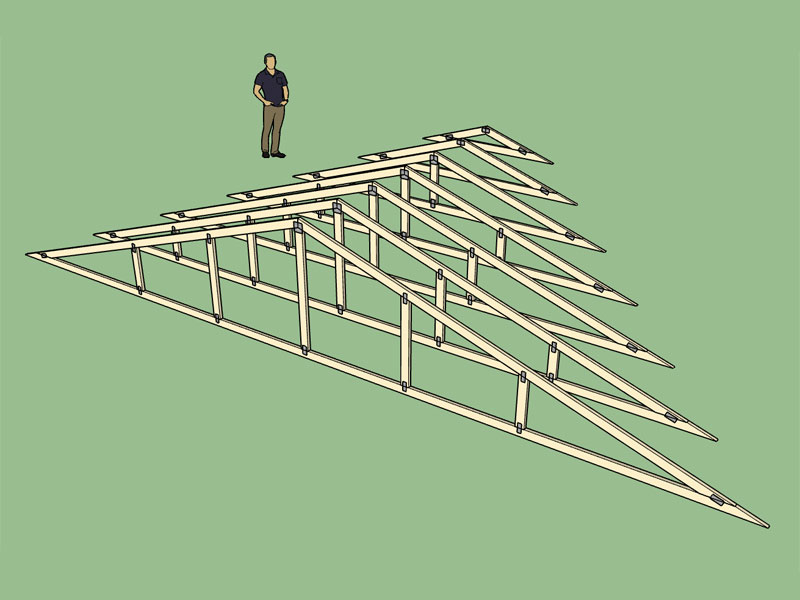
- Enabled materials and custom layers for gable, hip, shed, TJI and dutch gable rafter roofs.

#2267
Version 1.7.6 - 12.26.2016
- Enabled metal plate connectors for monopitch trusses.
- Enabled materials and custom layers for monopitch trusses.


View model here:

https://3dwarehouse.sketchup.com/model.html?id=40819b39-458c-4e87-8a5e-fe16982dfe1d
#2268
Version 1.7.5 - 12.24.2016
- Enabled metal plate connectors for valley truss sets.
- Enabled materials and custom layers for valley truss sets.


Merry Christmas to all.
#2269
This particular joint on a gambrel attic roof I am finding particularly difficult to plate:


Luckily I have a few samples to use as guides.  Given my web configurations at this joint this seems to be the most reasonable method to plate this joint.  Note that the plate  should touch the interior corner and the exterior of the lower top chord but at the same time not project past the lumber into the spaces.  Also the plate is rotated so that it is parallel to the upper top chords pitch.

The algorithm I devised to do this is quite clever I think but can be boiled down to a few concise lines of code:

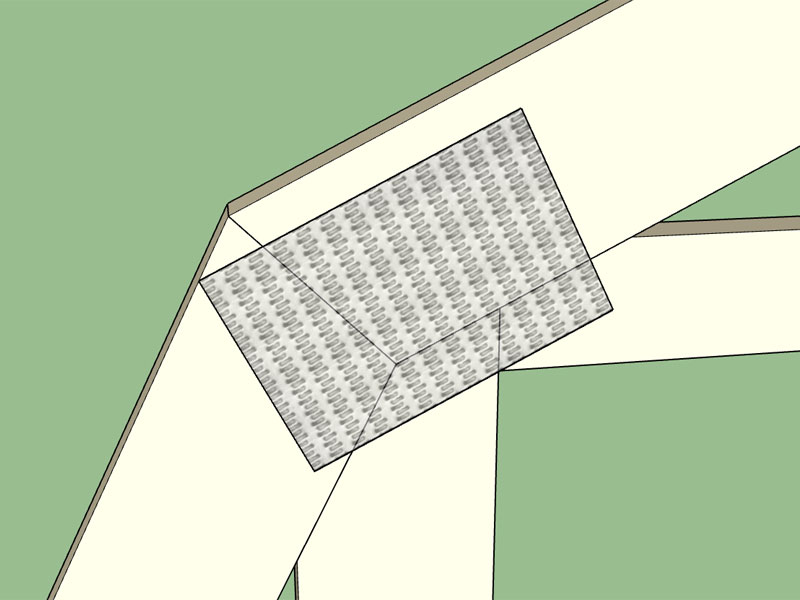
        # Plate 2 (Gambrel Left)

x2 = @W2x2 - (mpcyy)/(sin(@Phi2))
y2 = @W2y2
m2 = tan(@Phi2)

x1 = @X2
y1 = @Y2
m1 = tan(@Phi1)

x0 = (y2 - y1 - m2*x2 + m1*x1)/(m1 - m2)
y0 = y1 + m1*(x0 - x1)

xoffset = (mpcxx/2.0)*(cos(@Phi2)) + (mpcyy/2.0)*(sin(@Phi2))
yoffset = (mpcxx/2.0)*(sin(@Phi2)) - (mpcyy/2.0)*(cos(@Phi2))

mpcx = x0 + xoffset
mpcy = y0 + yoffset
mpcrot = -@Phi2
MedeekMethods.metal_plate mpcx, mpcy, mpcxx, mpcyy, mpcrot, "PLGL"


# Plate 2 (Gambrel Right)

mpcx = @X5 - mpcx
mpcy = mpcy
mpcrot = @Phi2
MedeekMethods.metal_plate mpcx, mpcy, mpcxx, mpcyy, mpcrot, "PLGR"


This joint has been the most difficult so far, everything else has been cake.
#2270
Plates applied to the top truss:


Specs:

- Truss Type: King Post
- 6x10 TC, 6x8 BC, 6x6 kingpost
- Plate thickness = 0.25"
- single row of bolts with two bolts per row.
- connector plate width = 4.0"
- Bolt Dia. 3/4"
- Bolt Edge Distance (timber) = 4.0"
- Bolt Edge Distance (plate) = 2.0"
- Bolt Spacing = 4.0"
- Bolts and Washers not shown. 

View model here:

https://3dwarehouse.sketchup.com/model.html?id=ed8f688c-a1a2-4c2a-b09a-8ee937060922
#2271
Looking through some old plans I've managed to dig up I came upon a couple of designs by another engineering firm. 

Typically when I've dealt with truss designs I always seen a scarf cut on the bottom chord with the top chord remaining un-notched.  In this other example the bottom chord is kept intact and the top chord is scarf cut or notched, while still allowing a continuous section to extend for the overhang with a depth equal to at least 1/2 the top chord depth.  I think the picture below explains this far better than I can with words:


For MPC trusses I am used to seeing a 1/4" butt cut, however for timber trusses what is more appropriate?

Which method above would go with (arch. and structural reasons)?

View model here:

https://3dwarehouse.sketchup.com/model.html?id=6d3633a4-3b5c-4b9f-9780-23be5230c66d
#2272
- Enabled metal plate connectors for floor trusses.


View model here:

https://3dwarehouse.sketchup.com/model.html?id=ec5402ad-0916-46f7-a84d-1bf7e57ed30f
#2273
Version 1.7.3 - 12.17.2016
- Added a "Materials" tab within the global settings; Auto material assigment (colors and textures) is now an option.
- Enabled materials and custom layers for floor trusses and joists.
- Enabled materials for common trusses: metal plate connectors, lumber, and OSB.


View model here:

https://3dwarehouse.sketchup.com/model.html?id=d9b8fa16-5a7a-43f8-8da5-fc8b913bcba7


A big thanks to those on the SketchUcation and SU board who helped me with the custom materials part of the API, the SketchUp community is a great asset.

By default the metal plate connectors, custom layers and auto materials is turned off in the global settings.
#2274
I like the new addition of the layers, it helps being able to hide certain aspects of the model.  This has led me to think it might be useful to somehow implement materials (colors, textures), either at the layer level or based on the geometry (ie. specific color or texture for the I-joist web -> OSB wood).

#2275
Version 1.7.2 - 12.16.2016
- Enabled custom layers for roof returns, battens and counter battens.
- License renewal enabled in Medeek Account Manager.
#2276
I need to review some of my old files (local residential designs) to get a better idea of timber truss designs but out of curiosity I attempted to manually create a sample timber truss to see how long it took me create one.  About an hour into it I had come up with this:


View model here:

https://3dwarehouse.sketchup.com/model.html?id=355ab1aa-b040-4fca-a5c2-393f49bf71d8


Specifications:

- King Post truss with 4:12 pitch, 12" overhang and 1/4" buttcut, span 28'
- 6x10 Timbers (TC, BC, King Post)
- 3/8" Thick Connector Plates
- 5/8" DIA. Heavy Hex Nuts and Bolts
- 2 Rows of Bolts
- 4.5" between rows of bolts
- 4" bolt spacing between bolts in a row
- Plates offset from timber by 3/4"
- Bolts offset from end of plates by 2"
- Bolts offset from edge of plates by 1.5"
- No washers

This particular connector plate configuration uses two additional bolts at the apex of the heel plates, many other variations are possible.

Please feel free to comment.  This example is just a concept to give me a better idea of the design parameters and issues with this type of truss.
#2277
The current TODO list:

1.  Hip Sets (Stepdown, California, Midwest, Northeast, Terminal) with and without drop-in purlin frames as applicable. Hip truss algorithm per June 15, 2016 post.
2.  Flat Trusses with html input.
3.  Barrel Vault, Clerestory, Studio Vault, and Double Inverted trusses.
4.  Html menus for each truss type.
5.  Update the manual and create more video tutorials.
6.  Extend connector plates and layers to each truss and roof type.
7.  Open Joist Floor Trusses.
8.  Polygon entry for floor trusses/joists versus currently available rectangular assemblies, also add in a function to cut a hole in the floor for a stair way or other opening. See Jul. 2, 2016 post.
9.  Dutch and Half Hip truss sets (See Jun. 14, 2016 post).
10.  Gable roof with solid sawn beam.
11.  Gable roof with "two" glulam or solid sawn beams. (cantilevered rafters).
12.  Html menu for each truss type for manual connector plate sizing.
13.  Add the roof to the gable dormer, see June 19, 2016 post.
14.  Hip and Shed Dormer.
15.  Gable, Hip and Dutch Gable Roof Minor.
16.  Engineering for Rafters, Joists and Sheathing.
17.  Bring the truss and beam engineering into the plugin versus an external link to my engineering site.  This would require porting all of my Perl code into Ruby.
18.  Add a dual pitch gable rafter roof.
19.  Add raised heels to each truss type that currently does not have this feature.
20.  Finish adding bird blocking option.
21.  PDF or HTML output (printable) showing details of a truss assembly (ie. shop drawings and layout)
22.  Update order system allowing $20 yearly license renewal.
23.  Further investigate materials (colors) for specific layers.
24.  Allow "editing" of a truss, floor or roof assembly.
25.  Timber trusses (with bolted plates).
26.  Complex hip roofs, this is related to roof minors (item 15).  Need to devise a straight skeleton algorithm.
27.  Integrate more tightly with other plugins as opportunity arises (ie. Estimator etc...)
28.  Gable end trusses for gambrel attic and attic trusses.
29.  Complete all configurations of each truss type and verify that each advanced option is correctly working (ie. polynesian truss needs more configurations).
30.  Add gable and full returns to the roof return option, currently only the hip return is available.
31.  Transition trusses.
32.  The Trim function seems to be working now I need to work on the Extend function.
33.  Steel and hybrid steel floor trusses.
34.  Explore adding in a stairway module and deck module, however these may become part of the upcoming Wall Plugin.
35.  In the advanced options for gambrel attic trusses create an option for a crow's beak, see June 20, 2016 post.

I know I'm missing a few items that I have on one of my paper lists but I can't find it right now.

The question is, other than item 1, what are the highest priority items on this list?

I've been basically sidelined since end of August so I am anxious to get this operation (neck) done with and over and really begin again in earnest to advance the development of the plugin.

My new job keeps me busy but not so busy that I can't spend a few hours each night plugging away at this list and weekends are certainly my friend in that regard.

Please feel free to let me know what other items should be added to the list.
#2278
When it comes to plates and connectors there is also the bolted plate connected trusses with larger timber members used for more architectural and ornamental work.  I am wondering if there is any interest in having a separate module for those truss types?

Something along these lines:


#2279
Enabled metal plate connectors for the 4/4 and 6/4 scissor trusses:


Each truss type and configuration needs its own special function to locate and auto-size each plate.  The code required is not difficult since most of it can be recycled but it is still time consuming to generate for each and every truss type with all of the many possible configurations.  I have not even considered raised heel trusses yet.  At some locations (ie. heel plates on a scissor truss) the truss configuration may cause the plate to fall outside of the perimeter of the truss in this case some additional logic is required to check for these instances.

View model here:

https://3dwarehouse.sketchup.com/model.html?id=16954124-d987-4a72-be11-5089a6be6221
#2280
As an interesting side note, one can turn off the truss layer and then measure the volume of the steel plates which yields 113.85 in3.  Multiply this by 0.284 for mild steel and you end up with a total weight of 32.3 lbs.  That is actually quite a bit of steel plates in this rather small truss package.  No wonder the truss plate manufacturers like Mitek make so much money on the sale of truss plates, the volume of steel is definitely there (194 plates).

The weight of the wood can just as easily be computed, making an assumption on the wood species (G, specific gravity of the wood), and moisture content (typically 19% at dry service conditions).

The appropriate equation to use for the density of wood can be found in the AWC NDS:

http://design.medeek.com/resources/documents/NDS2012_SUPPLEMENT_P12.pdf

For DF No. 2 the density would be 34.2 lbs/ft3

The volume of the wood is 22.06 ft3, multipled by 34.2 lbs/ft3 yields a total weight of the wood at 754.5 lbs.  Steel plus Wood = 786.8 lbs.

It may be useful to provide weight information at both the truss component level and the entire truss assembly, wood, steel and total weight.