I'm also looking at providing the option for eliminating the trimmers around windows and doors. It might be a simple modification or it might require quite a bit of jiggering to the logic I won't know until I really dig into the code and start testing it.
- Welcome to Medeek Forum.
Resources for Engineers, Architects, Designers, Contractors and Home Owners
This section allows you to view all posts made by this member. Note that you can only see posts made in areas you currently have access to.
#1396
Medeek Wall Plugin / Re: Advanced Framing or Optimum Value Engineering (OVE)
March 06, 2019, 12:19:02 PM #1397
Medeek Wall Plugin / Re: Advanced Framing or Optimum Value Engineering (OVE)
March 06, 2019, 12:17:12 PM
Where you have an inset wall (versus outset wall) the plugin should take into account the 5.5 inches and space the studs accordingly. However in certain circumstances an offset could probably come in handy where you want to fine tune the stud spacing start point.
The two wall below were created with a stud spacing of 24", a 16' wall adjoining a 12' wall. Notice the stud spacing is exactly where it should be:
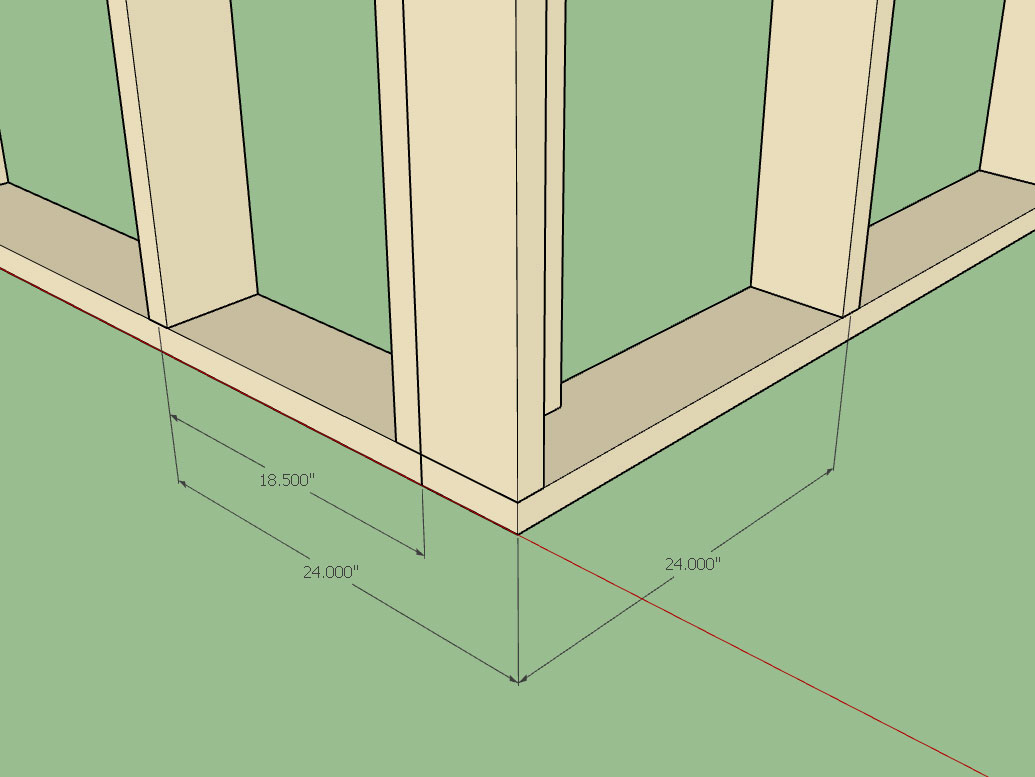
The two wall below were created with a stud spacing of 24", a 16' wall adjoining a 12' wall. Notice the stud spacing is exactly where it should be:
#1398
Medeek Wall Plugin / Re: Development and Updates for the Medeek Wall Plugin
March 06, 2019, 10:52:47 AM
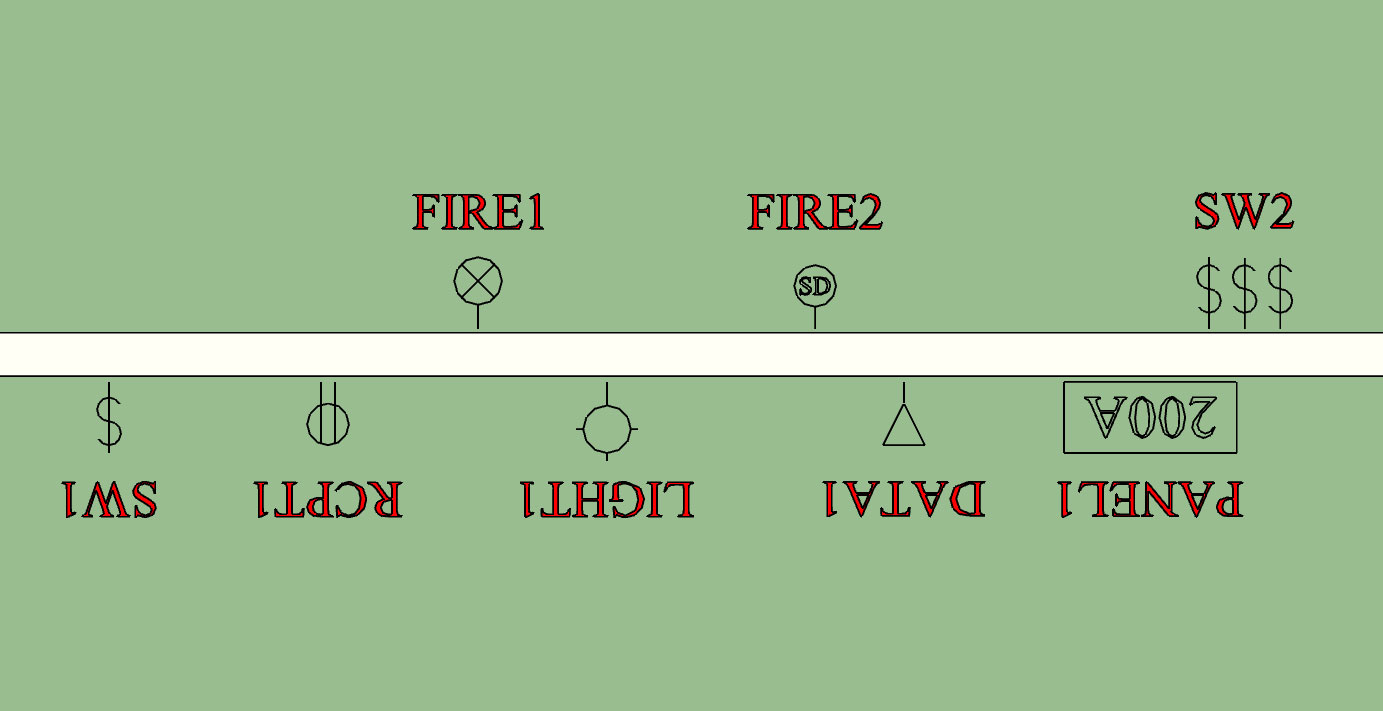
I've rolled out an update to the Electrical plugin (Version 0.9.5) with what I call parameter change highlighting.
If it is well received then I will make this same feature available with the draw menus of the wall plugin.
If it is well received then I will make this same feature available with the draw menus of the wall plugin.
#1399
Medeek Electrical Plugin / Re: Development and Updates for the Medeek Electrical Plugin
March 06, 2019, 10:45:08 AM
Version 0.9.5 - 03.06.2019
- Parameter change highlighting enabled for all draw menus: Outlets, Switches, Lights, Low Voltage, Panels, and Safety Devices.
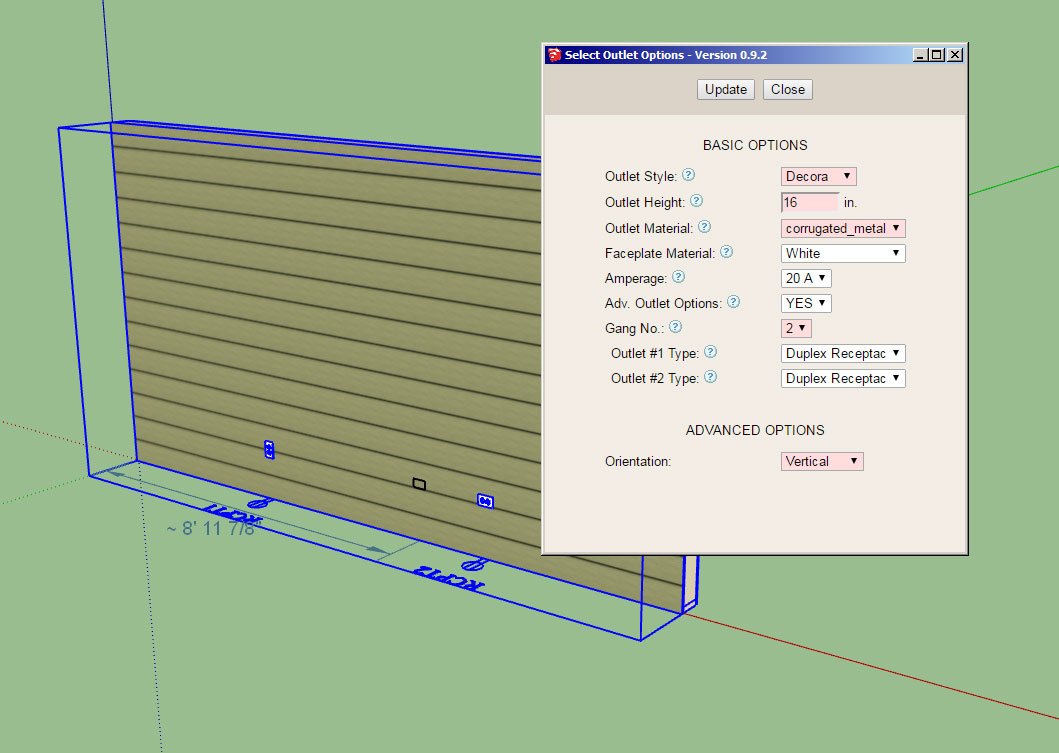
If this change is well received then I will make the same feature available with the other plugins.
- Parameter change highlighting enabled for all draw menus: Outlets, Switches, Lights, Low Voltage, Panels, and Safety Devices.
If this change is well received then I will make the same feature available with the other plugins.
#1400
Medeek Wall Plugin / Re: Development and Updates for the Medeek Wall Plugin
March 06, 2019, 10:31:19 AM
Thank-you for thinking this through further. I think you do bring up a good point with regards to how to deal with existing materials. I will give this some more thought.
Even after your build your first wall or many walls technically the material library is still in the game so to speak. If you choose a material for your sheathing or cladding that is from the library that has not already been defined in the SU material list for your model then the plugin will create this material based on the parameters from the material library. It is only once the material is defined that the plugin then uses the currently defined material and does not attempt to create it new or update it.
Even after your build your first wall or many walls technically the material library is still in the game so to speak. If you choose a material for your sheathing or cladding that is from the library that has not already been defined in the SU material list for your model then the plugin will create this material based on the parameters from the material library. It is only once the material is defined that the plugin then uses the currently defined material and does not attempt to create it new or update it.
#1401
Medeek Wall Plugin / Re: Development and Updates for the Medeek Wall Plugin
March 06, 2019, 08:43:49 AM
This is one of the finer points of the plugin that I should discuss regarding materials:
Without looking at your materials pane (tray) in SU I can probably guess that the plugin has already created a material called medeek_lumberpt and it is the default pressure treated color. The plugin will create the lumber and pressure treated lumber materials the first time you create a wall. Once the plugin creates a material it does not try to overwrite that material if it exists. The upside to this is that if you as the user decide to manually customize one of the materials after the fact the plugin will not blow away your changes.
The downside is that if you change any of the default colors they will not take affect unless you trigger the plugin to do so by removing or renaming the existing material. Remember the plugin will check for the existence of the material and if found it will not try to create it or recreate it. In order to have the plugin overwrite the medeek_lumberpt material the easiest thing to do would be to delete it or rename it in the SketchUp tray and then regen your walls.
Let me know what you get.
P.S. You can set the default color in the global settings and it will take affect with your next model. Alternatively you can also just manually edit your materials in the model within the SU tray. Again, once a material has been created by the plugin it will not try to recreate it unless it can't find it. Rather than having to regen all of your walls, just edit the medeek_lumberpt material and you are done. If you need to go back later and change it up again, then yes, that is not a problem.
#1402
Medeek Wall Plugin / Re: Development and Updates for the Medeek Wall Plugin
March 05, 2019, 10:02:24 PM
I'm testing out the concept in one of the electrical plugin menus since there is considerably less parameters and much faster to set it up so I can prototype the concept:
It's actually really easy to implement with two very small javascript functions.
I think a slightly different shade of red though, its a bit red for me, thoughts?
When you change any of the parameters it toggles the input to red. When you click the Update button they all become white again.
It's actually really easy to implement with two very small javascript functions.
I think a slightly different shade of red though, its a bit red for me, thoughts?
When you change any of the parameters it toggles the input to red. When you click the Update button they all become white again.
#1403
Medeek Wall Plugin / Re: Development and Updates for the Medeek Wall Plugin
March 05, 2019, 07:11:01 PMQuote from: airy on March 05, 2019, 06:54:09 PM
Within the "Draw Rectangular Wall Assembly" dialog (for that matter any dialog with an "Update" button), consider changing text to a red color when a parameter has been changed but before the "Update" button has been pressed. In this way you can see all the changes you have made before hitting "Update". Red text also indicates that if you start to draw a wall, then you are not using the "red" updated parameter. Hopefully this is the right place to recommend enhancements?
I really like this idea, I'm not sure on how to implement it yet but it is probably just some javascript using an "onchange" function. Let me see what I can come up with.
#1404
Medeek Wall Plugin / Re: Development and Updates for the Medeek Wall Plugin
March 05, 2019, 05:48:35 PM
Version 1.0.5 - 03.05.2019
- Added toolbar icons for "Documents" module.
- Added a Custom Header Library/Manager in the Headers tab of the Global Settings.
- Enabled custom headers for doors, windows and garage doors.
- Enabled three new header materials: LVL, PSL, and Timber.
Just a word of warning for those users on MacOS. The headers tab of the global settings (Page 2) will probably exhibit the same issue with the HTML menus as the Material Library. I am still trying to come up with a proper work around in the code that fixes the modal behavior on MacOS and so far it has confounded my best efforts.
What this means is that you will probably not be able to add or edit headers in the library currently if you are a Mac user. I sincerely apologize for the inconvenience and I am just as frustrated with this issue as you are right now.
In the meantime if you need to (manually) edit the header libraries they are stored in the "library_headers" sub-folder of the plugin. There are two files, one is for imperial headers and one is for metric headers. Either file is a simple text filed deliminated by vertical bars.
The text files can be edited in any text editor (eg. notepad, wordpad, TextEdit etc...)
Each row or line of the library file contains seven columns or entries.
The first the row is the header name with "mdkheader_" prefix attached.
The second row is the header name.
The third row is the header depth (in./mm)
The fourth row is the header thickness (in./mm)
The fifth row is the header ply (1,2 or 3)
The sixth row is the header material (LUMBER, TIMBER, LSL, PSL, or LVL)
The seventh row is the header status (ACTIVE or INACTIVE)
Note that the material library can also be modified manually however if textures are involved it becomes slightly more complicated as you would also need to place a copy of the image file in the "library_mats" sub-folder along with editing the MATERIAL_LIBRARY.txt file.
#1405
Medeek Wall Plugin / Re: Development and Updates for the Medeek Wall Plugin
March 04, 2019, 09:57:16 PM
The three new header types being added are:
LVL, PSL and Timber
The thing I really like about having the Custom Library is that I no longer have to worry about trying to figure out what header sizes and combinations everyone wants. Now you can create your own sizes with a choice of 1 thru 3 plies and five different materials to choose from. The possibilities are limitless.
I had a pretty good handle on standard imperial sizes but the metric world was well beyond the scope of my limited knowledge of other countries building practices and standards.
The other upside is that you can narrow down the library to specific sizes you actually use so your drop downs are no longer cluttered with sizes that mean nothing to you.
Glulam headers are not handled by the custom library and remain a separate module but the offering there is vast so I do not think users will find it limiting in any way.
#1406
Medeek Wall Plugin / Re: Development and Updates for the Medeek Wall Plugin
March 04, 2019, 04:06:00 PM
I will be creating a new toolbar within the Wall plugin that will be called Medeek Documents. This will be the start of the Scenes/Layout piece of the mdkBIM package. Eventually I will pull this out of the Wall plugin since it will be similar to the Medeek Estimator in that it will eventually work with roofs, floors and foundations and not just wall panels.
The toolbar and its icons will be the following:
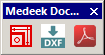
The first icon will allow the user to select various assemblies and generate corresponding scenes that can then be utilized within Layout. For example a framer or contractor may want framing details with dimensions for each wall panel.
The second icon will allow one to export DXF documents for floor plans, roof framing plans, wall framing plans etc... This one is going to be a big project.
The third icon will essentially do the same thing as the DXF export function however it will automatically push it out to a PDF document using the built in Ruby Gem (Prawn). Again this will be a big project as well.
The DXF and PDF function are rather low on the todo list for now, but I would like to enable the scene generator as soon as possible and after reviewing the applicable sections of the SketchUp API it shouldn't require more than a few lines of code to pull it off.
The toolbar and its icons will be the following:
The first icon will allow the user to select various assemblies and generate corresponding scenes that can then be utilized within Layout. For example a framer or contractor may want framing details with dimensions for each wall panel.
The second icon will allow one to export DXF documents for floor plans, roof framing plans, wall framing plans etc... This one is going to be a big project.
The third icon will essentially do the same thing as the DXF export function however it will automatically push it out to a PDF document using the built in Ruby Gem (Prawn). Again this will be a big project as well.
The DXF and PDF function are rather low on the todo list for now, but I would like to enable the scene generator as soon as possible and after reviewing the applicable sections of the SketchUp API it shouldn't require more than a few lines of code to pull it off.
#1407
Medeek Wall Plugin / Re: Development and Updates for the Medeek Wall Plugin
March 04, 2019, 08:58:34 AM
First look at the Custom Header Library (Manager):
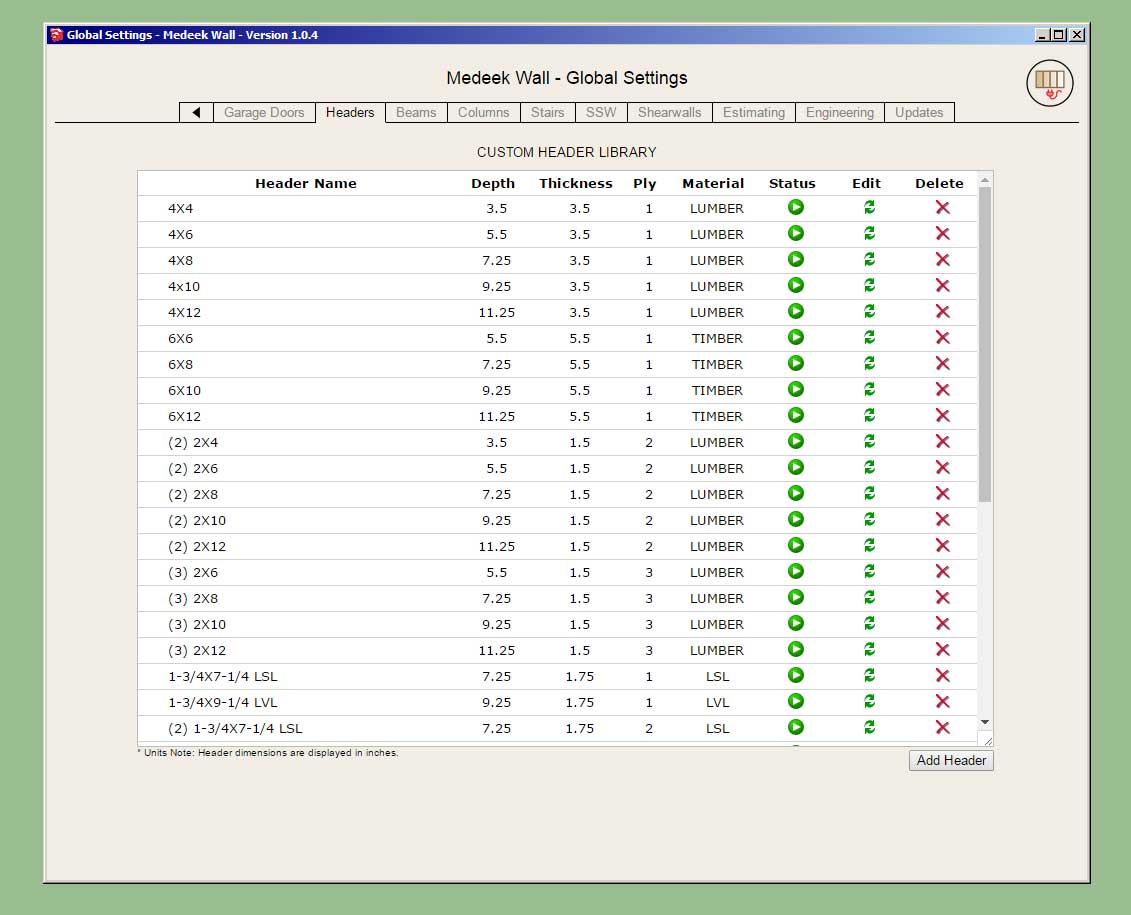
The look and feel is somewhat similar to the material manager, but it may evolve further as we go.
I've set it up so that metric and imperial libraries are stored in completely separate files. Each library is loaded based on the currents units of the model. This allows one to maintain two distinct header libraries, one for imperial sizes and one for metric sizes.
Metric header sizes (dimensions) will be displayed in millimetres, imperial in inches.
Names or the description may include spaces as shown.
There are five basic parameters for a given header: name, depth, thickness, ply and material.
The ply is limited currently to 1,2 or 3.
Materials are limited to: Lumber, Timber, LSL, PSL, LVL
There are other more exotic header configurations (ie. foam sandwiches etc...) however this update will at least allow the user to create their own custom sized headers.
P.S. This is a fairly major change in the plugin which affects a lot of elements (doors, windows, garage doors) and a lot of menus (global settings, draw and edit). As such it will probably take me another day or two to make sure that I've updated everything affected by this change and it all works well together.
Another thing worth noting is that if you create a wall with a given header name (eg. 4X4) and then delete that header from your library, on purpose or even accidentally then the plugin will no longer be able to complete a lookup on that particular header name. If the plugin cannot find the header name in the library it will simply default to a 6x6 timber header by default. The purpose behind this behavior is that you can then go into the global settings update/edit a particular header and then regen your walls and they will update with the new parameters for the updated header.
Also these two words are reserved words and should not be used in naming your headers: GLULAM, NONE
#1408
Medeek Truss Plugin / Re: Development and Updates for the Medeek Truss Plugin
March 03, 2019, 03:33:37 PM
Related links to the Truss Plugin:
Main Web Page:
http://design.medeek.com/resources/medeektrussplugin.html
Changlog:
http://design.medeek.com/resources/pluginchangelog.html
Registered User Map:
http://design.medeek.com/calculator/sketchup/data/medeektrusspluginusermap.pl
Vendor Products:
http://design.medeek.com/resources/pluginvendors.html
Truss Calculator (Common Fink Truss Only):
http://design.medeek.com/calculator/calculator.pl
Snow, Seismic and Winds Loads and other resources:
http://design.medeek.com/resources/resources.html
#1409
Medeek Wall Plugin / Re: Development and Updates for the Medeek Wall Plugin
March 02, 2019, 08:50:41 PM
I'm thinking about adding in a "Header Manager" that allows the user to basically create and manage their various headers for doors, windows and garage doors. Glulam headers will still be a special case situation which will not be managed by this interface.
The only road block I'm running into with this is I have an issue with MacOS and the show modal incompatibility. I still have not determined the resolution to this problem which is affecting the Material Manager in the global settings.
The only road block I'm running into with this is I have an issue with MacOS and the show modal incompatibility. I still have not determined the resolution to this problem which is affecting the Material Manager in the global settings.
#1410
Medeek Electrical Plugin / Re: Development and Updates for the Medeek Electrical Plugin
March 01, 2019, 04:05:05 PM
Version 0.9.4 - 03.01.2019
- Added a parameter into the global settings to allow for adjustment of the size of symbols and labels.
- Added a parameter into the global settings to allow for adjustment of the font for text found within symbols and labels.
- Added a parameter into the global settings to allow for adjustment of the size of symbols and labels.
- Added a parameter into the global settings to allow for adjustment of the font for text found within symbols and labels.