News:

SMF - Just Installed!

Main Menu
Menu

Show posts

This section allows you to view all posts made by this member. Note that you can only see posts made in areas you currently have access to.

Show posts Menu

Messages - Medeek

#1066
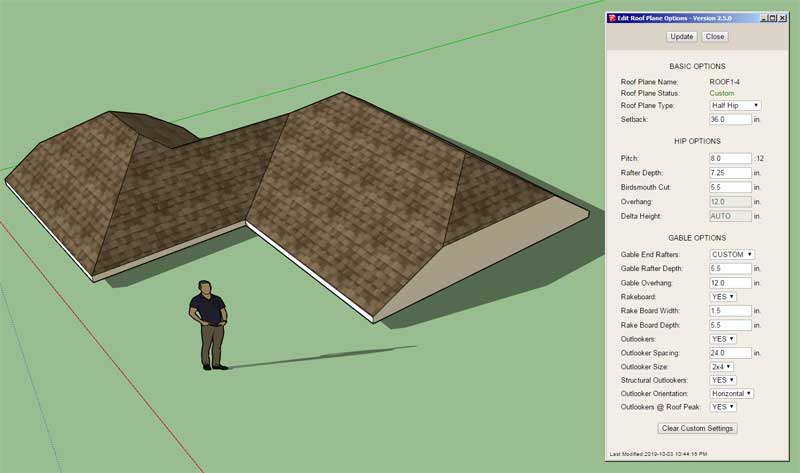
First look at labels with cladding and sheathing:


View model here:

https://3dwarehouse.sketchup.com/model/22e3874d-67ec-48a3-b89f-c4001e806a5f/Complex-Roof-Test-6

I need to add a scale factor for the text size which will allow the user to adjust the size of the text for the labels.  I actually need this for the entire plugin, not just this module.

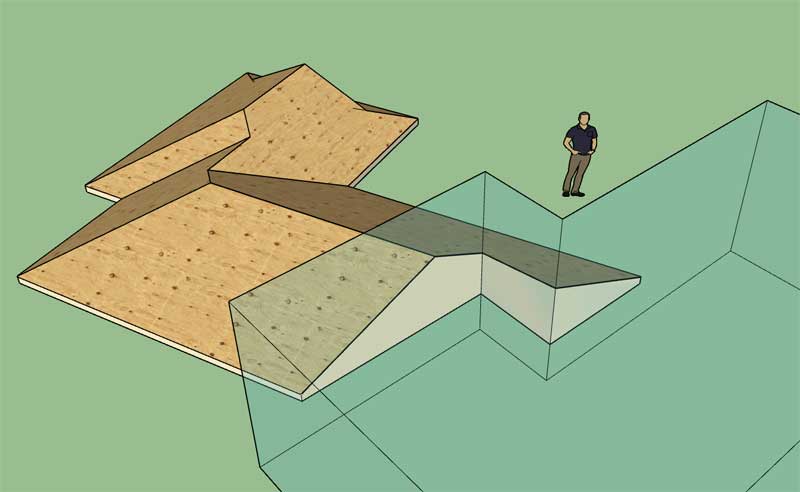
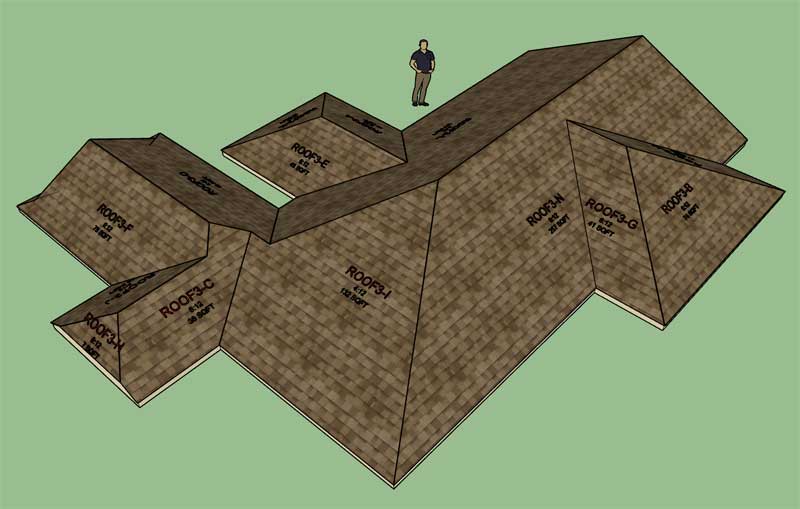
The other issue is ordering the roof planes which may or may not be the same as the number of roof edges.  Note, that sometimes roof edges are collinear and if their other parameters are the same (ie. pitch, overhang etc...) the roof planes will merge into one.  For example take roof plane "N" in the model shown, it is bounded by two separate eave edges.

The ordering of roof planes gets a little bit interesting in these cases but all one can do is one's best to bring as much order to the chaos as possible.

Each label is centered on its respective roof plane (via the bounds.center method), sometimes this works out and sometimes it doesn't.  I don't really have any ideas on a better algorithm for the time being.
#1067
That cladding extension parameter was a real pain.  However, as you can see in the image below it is now working for the half hip configuration:


Cladding is now complete, thankfully

I'm thinking about working on the roof plane labels next and then on to the sub-fascia.
#1068
The question "Can I manually edit my wall assemblies?", seems to come up quite often. 

*** Important Information ***

The parametrics (editing) with regards to the plugin(s) require that when you edit any wall assembly, roof assembly, foundation assembly etc... it regenerates the geometry from the parameters stored for that assembly.

If you are going to manually edit an assembly just be sure not to regen it, by editing it or adding windows, doors etc...  after you have done any manual edits.  When you edit an assembly it essentially removes the existing geometry created by the plugin and redraws it.  If you have altered the geometry created by the plugin it will also remove any of those manual edits. 

You can effectively lock an assembly by removing the instance name (or replace it with something else).  When you remove the key words in the assembly instance name the plugin(s) no longer recognizes the assemblies as something they can edit and hence they become "locked" for editing.

You can also unlock a valid assembly (provided it still has its attribute library) by putting the keywords back into an instance name.  You will notice that each type of assembly has specific keywords utilized in its instance name.

The problem with manual editing is that, yes you can do it, but the plugins have no way of knowing what changes you have done to the assembly and when it goes to rebuild/regen the only information it has is the parameters stored in its attribute library (database) for that assembly.  If you explode the group that contains the assembly the attribute library for that group (assembly) is deleted and even if you were to group the assembly back together the attribute library will no longer be present and hence the assembly is no longer a parametric Medeek assembly.

If you want to include custom components or groups within your assemblies (wall, truss etc...) and you want those "additional" geometric objects retained after a rebuild then you can accomplish this by including the keyword "CUSTOM" or "custom" within the sub-group or components instance name.

Also note that any non-grouped geometry (ie. edges and faces) will also be retained within the assembly by default.

In fact, this is exactly how the electrical plugin works in concert with the Wall and Truss plugins.  All of the electrical groups within your wall panels, utilize a special key word in their instance names.  This allows them to be retained within the larger assemblies. 

There is a method to my madness.
#1069
First look at cladding with the cladding extension active:


As you can see asymmetric roofs tend to complicate things slightly but regardless the correct lateral extension is achieved (0.75").  I will need to go back into the other rafter roof modules and correct this feature, I don't think I have it quite right. 

Because of the possibility of fascia and the cladding extension parameter, the cladding becomes a bit more involved not only for hip roofs but also along the rake edges of dutch gables, gables and half hips.  All of these roof end conditions have unique solutions when it comes to cladding, and unfortunately it requires a fair bit of logic and coding on my part to make it happen.

The interesting thing about what I do is not so much about the programming, but more the manipulation of the data and the topological and geometric problems I am able to solve, with nothing more than a well written API, some ruby code, and at times some serious mental contortions.  I have certainly become well acquainted with the Geom module in the SketchUp API.
#1070
First look at roof sheathing:


I've exploded the model so you can get a better idea of all the elements in the assembly.

Note, that the roof outline group will always be at the same Z height as your input points or (top of wall plate).

Due to overhangs and your roof pitch the roof primitive may extend below the outline, hence the reason I hide the roof primitive layer when initiating the edge move tool or roof plane edit tool.

For cladding I still need to do some work due to the roof extension parameter, this complicates the geometry slightly since the cladding is not based on the same face (edge points) as the sheathing is.
#1071
When you are connecting a roof into an arbitrary solid (ie. walls) you may end up with something like this:


View model here:

https://3dwarehouse.sketchup.com/model/7fa53493-8c52-4495-8ce4-88f129fdc80e/Roof-Connector-Test-3

You will notice I've modified the roof primitive to emphasize the gable overhang.  The key takeaway is that a roof connection should be treated like a gable end condition but with a certain amount subtracted away.  That way if you do have a situation like the one shown, you will get your rakeboard etc... The trick of course is too make sure the logic is smart enough to identify these potential configurations and then adjust for them.
#1072
If things weren't complicated enough with complex roofs, they just got a lot more complicated.

Rather than having two or three different types of connections I think it makes more sense to sub divide it into two additional options and then a connection is simply a connection.  You end up with two additional options:  TERMINAL and CONNECTION

With terminal it is very similar to a gable end however the roof just ends, no overhangs, no outlookers etc...  This would be used when framing the roof up to a wall that is parallel to the roof edge.  Theoretically this same type of roof could be achieved with the CONNECTION option however it would remove the requirement for selecting a primary roof (or solid) to connect to, and just simply end the roof in a squared off fashion.

The CONNECTION option is a bit more interesting. To get the results that we want we need to make this end treatment as general as possible.  One could potentially connect to any group or component in the model or to another Medeek complex roof assembly.  I will need a tool within a tool which allows the user to select the primary roof/object that they would like to connect to. 

1. If the selected group is a Medeek roof assembly then the primary roof will also store that it is being connected to by a secondary roof, and the secondary roof will list the instance name of the primary roof it is connecting to.

2. If the selected group or component (must be a solid) is a non-Medeek roof assembly it will also store and list the instance name of the primary object that the roof is connecting to.

Here are shown a couple of possible connection scenarios:


Connecting to another complex roof at an oblique angle and below the fascia line.


Connecting to a non-Medeek roof (solid group).

To keep this option from completely spiraling out of control we must make the assumption that the only roof planes impacted by the connection will be the two adjacent and orthogonal roof planes that are either side of the connection roof edge (the connecting roof plane technically does not exist).  I'm sure there will be users who try to subvert this requirement in certain design situations, so some logic to check this limitations may need to be implemented.

View model here:

https://3dwarehouse.sketchup.com/model/bae4d93d-c72f-4445-828e-96e1e3d9e202/Roof-Connector-Test-2
#1073
I've been thinking about connecting roofs together, for example a gable roof connecting to another building where the roof meets the wall.  For this type of scenario it might be useful to have an option for a cutoff end (gable end with no overhang etc...  I'm not sure exactly what to call this.

P.S. 

It's funny where my thoughts take me when I take a breather from the code, I guess even when I'm on break I'm still contemplating what needs to be done with these plugins.  I just realized that I can enable one additional option in addition to all the other options (ie. gable, dutch gable, half hip). I will call this a "CONNECTION".  Basically you will be able to connect one roof to another (secondary roof).  However, rather than having a separate module for the secondary roof I just realized that with the connection option complex roofs can become secondary roofs, so an additional module is not necessary.

I will need to give this considerably more thought but I think this direction I need to go.  There will need to be some options for connection type (another roof, a wall or a roof and a wall).  I will need to explore the possibilities, this is going to get interesting.
#1074
Version 2.5.3 - 10.05.2019
- Added sheathing for complex roofs.
- Fixed the sheathing at the gable overhang for dutch gable complex roofs.


As shown in the image the sheathing with a dutch gable roof tucks up under the overhanging gable end.

View model here:

https://3dwarehouse.sketchup.com/model/9b22a58d-9a63-4946-b9fe-e9bf0de0f2af/Dutch-Gable-Complex-Roof-Test-2

With this fix I think we are now 100% with the sheathing.  I will begin the cladding next.
#1075
The rebuild time on this model takes about 1.5 seconds.  That is just with the roof primitive and sheathing.


The question is what will the rebuild time be like for a model/roof this complex when all of the rafters and other accoutrements are included?

View model here:

https://3dwarehouse.sketchup.com/model/cbb4f973-a333-42a0-8262-70d351fa5f7b/Complex-Roof-Test-5
#1076
A few more kinks to work out in the sheathing module, but overall it is working better than expected and it wasn't nearly as hard to code as I initially thought it would be.

View model here:

https://3dwarehouse.sketchup.com/model/bebebadb-fefc-48a5-808c-6380ca367912/Complex-Roof-Sheathing-Test-1

Still a bit more work to do with sheathing when the dutch gable option is utilized.  As you can tell from the model the sheathing is not tucking under the gable end overhang just yet.  I will be addressing this tomorrow.
#1077
First look at roof sheathing:


Roof cladding is a little more involved because of the cladding extension parameter.
#1078
Version 2.5.2 - 10.04.2019
- Added the half hip option for complex roofs within the "Edit Roof Plane" tool/menu.
- Added the dutch gable option for complex roofs within the "Edit Roof Plane" tool/menu.
- The "Edit Roof Plane" tool has been made non-persistent to further improve stability.

#1079
First look at dutch gable complex roofs:


(textures added to roof primitive for effect)

After I setup the system for the half hip this one fell out without too much trouble. 

View model here:

https://3dwarehouse.sketchup.com/model/6f5908e1-189d-420e-8675-78cbe32ef522/Dutch-Gable-Complex-Roof

Now it is time to move on to the sheathing and cladding, but first I need to add in some options for battens and cross battens.
#1080
First look at half hip complex roofs:


(textures added to roof primitive for effect)

Notice the additional "setback" parameter in the menu.  Also a half hip roof plane has both hip and gable parameters with the non-applicable parameters grayed out, as shown.

Similar to a gable end, the half hip can only be applied to certain roof planes, the plugin automatically restricts this placement.

The overhang of the half hip is governed by the gable overhang parameter, hence the overhang under the hip options is grayed out.

Now, on to the dutch gable...