News:

SMF - Just Installed!

Main Menu
Menu

Show posts

This section allows you to view all posts made by this member. Note that you can only see posts made in areas you currently have access to.

Show posts Menu

Messages - Medeek

#1516
Version 1.1.9 - 01.03.2019
- Foundation and Footing labels option added to the General tab of the Global Settings.
- Foundation and Footing label prefixes can be customized in the General tab of the Global Settings.
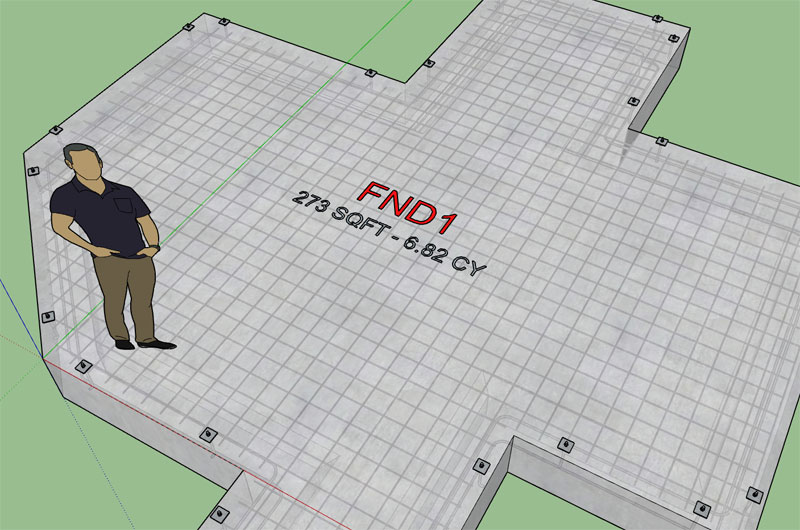
- Foundation labels enabled for slab-on-grade foundations.
- When construction callouts are enabled the overall area and volume (concrete) of the foundation is displayed beneath foundation label (currently only slab-on-grade foundation assemblies have this feature available).
- Added customizable colors for lumber, PT Lumber and labels within the Materials tab of the Global Settings.
- Added additional layers for dimensions, annotations, 2d geometry, building code and engineering.

The customizable colors for the lumber (PT) will not take affect until I update the stemwall module.  Currently the color of the lumber is still hard coded into this module.

I am also working on an update to the Medeek Estimator which will then allow the user to quantify foundations as well as roof and wall assemblies.

So far I have the concrete, rebar, and anchor bolts queued up for analysis in the estimator module.  I will need to still work on adding in the insulation (foam) for the FPSF option.  The first foundation type that will be made available in the estimator is the slab-on-grade.  Once I am satisfied with the integration between the two plugins I will continue to flesh out the rest of the foundation types.

The bigger issue right now is the lack of parametrics for this plugin.  With the addition of the attribute library I am one step closer to making this happen.  There is really nothing special that needs to happen it is just a matter of pulling together the HTML menus and other tedious tasks within the Ruby code.

I apologize that it has taken this long to begin to address the parametrics issue.  As can be seen in the changelog I had a burst of activity in 2017 and then only recently began to slowly process other updates. 

http://design.medeek.com/resources/foundationpluginchangelog.html

Most of my time has been spent on the other two plugins but it is my goal this year to bring this plugin up to par with the other two.
#1517
Callouts (label, area, volume) are now working for the  Slab-on-Grade foundation type (rectangle, polygon and face):


Now I just need to add the stats tabe into the attributes and then we can also bring this data into the Medeek Estimator module.

I think it would also be useful to quantify the rebar and provide the size (dia.) and total lineal feet for each size used.  For the wires mesh I'm assuming that number would be a sqft (area) but I'm not sure whether to provide the area which includes my (inside) offset or just the total area of the slab itself. 

Anchor bolts are easy (size and qty.)

All also have the FPSF option which includes foam around the perimeter of the foundation.  I'm assuming this number would probably be the thickness and sqft (area)?

Note that the area dimension is the total area of the slab per its outer perimeter, so a garage curb will not change this number.
#1518
Off Topic / Conway's Game of Life in SketchUp
December 31, 2018, 02:42:23 AM
Conway's Game of Life or Saturday Night Fever, I'm not sure which:


If the grid is much bigger than 20x20 it really slows down, at least on my computer.

Something like this probably needs to run at a lower level than the Ruby API.

My code is below:


    ### Conway Gameboard ####

    model = Sketchup.active_model
    entities = model.active_entities
    @view = model.active_view
    @faces = []

    @cycles = 0
    ysize = 18
    xsize = 18
    blk = 12

    model.start_operation('Generate Game Board', true, false, true)

    for j in 0..(ysize-1)

       for i in 0..(xsize-1)
          i2 = i + 1
          j2 = j + 1
          pt1 = [(i*blk),(j*blk),0]
          pt2 = [(i2*blk),(j*blk),0]
          pt3 = [(i2*blk),(j2*blk),0]
          pt4 = [(i*blk),(j2*blk),0]
          face1 = entities.add_face(pt1, pt2, pt3, pt4)
         
          face1.reverse! if (rand(4)<2)

          @faces << face1
       end
    end

    model.commit_operation


    def calc_conway

       @update_array = []

       for facei in @faces
       
          adj_live_count = 0
         
          if facei.normal.samedirection? Z_AXIS
             facei_status = true
          else
             facei_status = false
          end
       
          adj_faces_list = @faces.find_all { |e| !facei.bounds.intersect(e.bounds).empty? }
          adj_faces_list.delete(facei)
         
          for face_adj in adj_faces_list
             if face_adj.normal.samedirection? Z_AXIS
                adj_live_count += 1
             end   
          end
       
          if facei_status
             # Cell is Live
             if adj_live_count < 2
                @update_array << true
             elsif adj_live_count < 4
                @update_array << false
             else
                @update_array << true
             end
          else
             # Cell is Dead
             if adj_live_count == 3
                @update_array << true
             else
                @update_array << false
             end
          end
       end

       counter = 0
       for facei in @faces
          if @update_array[counter]
             facei.reverse!
          end
          counter += 1
       end

       @view.refresh
       @cycles += 1

       if @cycles > 200
          UI.stop_timer(@conwaytimer)
       end
    end


    model.start_operation('Run Game of Life', true, false, true)

    @conwaytimer = UI.start_timer(0.02, true) { calc_conway }

    model.commit_operation
#1519
Version 2.2.7c - 12.30.2018
- Enabled roof labels and framing callouts for all rafter roof assemblies: Gable, Hip, Dutch Gable, TJI, TJI w/ Glulam, Shed etc...


I've also been thinking about how to best handle holes or cutouts in the roof sheathing and cladding that are not only parametric but can be properly reported by the estimator (ie. net area vs. gross area).  I think I have a system worked out, I just need to implement the prototype and test it out.

The cut out or hole tool will have a few options.  One of the options will allow the user to specify whether to cut the cladding, sheathing or framing or all of them.  If the framing is cut then another option for framing in the opening.

I may also provide another option to provide a skylight to cover an opening or other construction elements (eg. vents, whirlybirds etc...)
#1520
Version 2.2.7b - 12.29.2018
- Enabled roof labels and framing callouts for monopitch truss assemblies.
- Added stats (roof sheathing) for common and monopitch truss roofs which can be analyzed within the Medeek Estimator (Wall Extension) module.

In order to use this new feature you must also have the Wall plugin installed and upgraded to Version 0.9.9v, See Wall plugin thread for further details.
#1521
Version 0.9.9v - 12.29.2018
- Added roof sheathing to the Medeek Estimator (common and monopitch truss assemblies).

In order for this cross plugin communication/analysis to work correctly you must also upgrade the Truss plugin to the latest version (2.2.7b - 12.29.2018).  The latest truss plugin version has statistics enabled for common and monopitch truss roofs.

Note that the Medeek Estimator is largely experimental (but functional) at this point.  I am essentially setting up the templates and overall organization. Once I am satisfied with the general layout and system I will begin to fully flesh it out with all of the various construction elements (eg. studs, plates, windows, doors, etc...)

I may also separate the Medeek Estimator module into its own stand along plugin since technically it can work with either the Wall or Truss plugin or both.  I will also be augmenting the Foundation plugin with statistics so that its output can also be analyzed in the estimator.

If I do pull it out then it will not really be a stand along plugin as much as an add on that works specifically with the mdkBIM suite since it is not setup to analyze generic models like Quantifier or Estimator (John Brock). 
#1522
I just received my copy of John's new book yesterday. 

https://www.amazon.com/gp/product/1119484006/ref=dbs_a_def_rwt_hsch_vapi_taft_p1_i0

I haven't had a chance yet to thoroughly review it from cover to cover but at a cursory glance it appears that it is a fairly complete text.  I was actually quite surprised to the level of detail that John models his homes.  I didn't expect to see all of the electrical outlets and switches however the major duct work for the HVAC does seem like an excellent idea so as to avoid clashes with other building elements.

I was pleasantly surprised to see that the Truss plugin was included in the text.  Of course the wall plugin was released probably after the book went to press so it did not get any coverage but hopefully it might find its way into the 2nd edition.

I've got to say though, those Lumion renderings are something else.  At first glance I thought I was looking at the actual completed residence.

I think I would have liked to see a more in depth treatment in Part IV (Construction Documents) with regards to Layout and more examples of actual construction documents but overall I think this book will be a good reference and earns a spot on my bookshelf.
#1523
Version 1.1.8b - 12.28.2018
- Fixed bug in the registration/licensing module.
#1524
Version 2.2.7 - 12.27.2018
- Roof and Floor labels option added to the General tab of the Global Settings.
- Roof and Floor label prefixes can be customized in the General tab of the Global Settings.
- Roof labels enabled for common trusses.
- When framing callouts are enabled the area of each roof plane will be shown below the roof label (currently only common truss assemblies have this feature available).
- Added a customizable color for roof and floor labels within the Material tab of the Global Settings.
- Added additional layers for dimensions, annotations, 2d geometry, building code and engineering.

#1525
I've been thinking about labels for truss and rafter roofs and I would like to add in some sort of labeling system like the Wall plugin.

With a typical gable roof I will have a label on each side of the roof aligned with the roof plane but offset vertically so it does not Z fight with the sheathing or cladding (shingles).  The label will be similar to the Wall plugin where the user can customize the prefix (eg Roof1, Truss1, Rafter1 etc...)

Each side will be designated a letter, so Roof1-A and Roof1-B.  Hip roofs will have four roof planes so A, B, C and D.

If the framing callout is enabled then beneath the label will show the area for that roof plane (sheathing):

#1526
Version 0.9.9u - 12.22.2018
- Enabled temporary (construction) dimensions for beams in the Draw Beam tool.
- Enabled temporary (construction) dimensions for stairs in the Draw Stair tool.
- Added 2D construction lines for exterior wainscoting.
- When the cladding or wainscoting air gap is greater than zero the 2D construction lines are drawn in order to represent the interior surface.

#1527
Version 1.1.8 - 12.21.2018
- Enabled temporary (construction) dimensions for all foundation types.
- Added a section in the General tab of the global settings for configuring construction dimensions.
- Licensee name now appears in the License tab of the Global Settings when plugin is registered.
#1528
There has been some call for a tool that is similar to the split tool but rather than selecting just one face you would select two faces and a section could be removed from the solid object (imagine two infinite planes cutting a slice out of your solid object).  I'm not exactly sure what to call this possible tool (section cut?).

The other question is whether to have the tool break the solid into two separate groups or components like the split tool or just leave the resulting geometry as one group/component?   I suppose I could always enable an option that would allow the user to toggle between these to behaviors offering some flexibility to the user.

Similar to the split tool I could allow the user to define the cutting planes but either selecting two faces or selecting six points, or a combination of three points and a face or a face and three points.  Lots of permutations here... just makes the code a little more fun.

With regards to the cutting planes, they could be parallel or they might not be, it doesn't really matter.  Just as I am doing in the split tool I will need to include logic that checks to see that the cutting planes actually do intersect the solids otherwise no action will be performed.  The two cutting planes cannot be perpendicular to each otherwise a valid solution cannot be obtained, or at least that is what I initially thought.  I will need to give that possible solution some more thought.  If a solution can be obtained there is no reason to discard it.  There may be some overlap with the Trim 2 function, but that tool does not have the ability to separate the solid into different groups.

Any thoughts or suggestions with regard to this potential addition to the tools?

Also just a reminder that even though I am including these tools within the Truss plugin they are designed to work with any solid geometry created in SketchUp, it doesn't need to be plugin related geometry.
#1529
Version 2.2.6c - 12.18.2018
- Addressed a bug in the Split function regarding nested groups and components.

This is a critical fix for this tool.  I strongly suggest that everyone upgrade from 2.2.6b to 2.2.6c.

Let me know if there are any other tools that might come in handy with manipulating an architectural model.  I think the six tools now available can cover most tasks but I'm sure I'm missing something.
#1530
Version 2.2.6b - 12.18.2018
- Added the Split icon to the Medeek Tools toolbar.
- Added the Split function for (solid) groups and components: split plane via one face or three points.


When you first click on the tool it defaults to the user selecting a face for the cutting plane however if you hit the "CTRL" key in Windows it will toggle to the three point mode.

Tutorial 13 - Split Tool: