If you've recently update the Wall plugin from a version prior to Version 1.4.0 then I strongly advise to reset your global settings in the General Tab of the Global Settings. If this does not resolve the issue then turn on the Ruby Console and duplicate the error and then email me the error codes generated (nathan@medeek.com).
- Welcome to Medeek Forum.
Resources for Engineers, Architects, Designers, Contractors and Home Owners
This section allows you to view all posts made by this member. Note that you can only see posts made in areas you currently have access to.
#706
Medeek Wall Plugin / Re: Development and Updates for the Medeek Wall Plugin
October 26, 2020, 11:37:12 AM #707
Medeek Wall Plugin / Re: Development and Updates for the Medeek Wall Plugin
October 23, 2020, 06:14:40 PM
Version 1.7.0 - 10.23.2020
- Fixed a bug in the Walls tab of the Global Settings.
- Fixed a bug in the Walls tab of the Global Settings.
#708
Medeek Truss Plugin / Re: Development and Updates for the Medeek Truss Plugin
October 23, 2020, 11:17:30 AM
Version 2.7.9 - 10.23.2020
- Fixed a "rounding error" bug for pyramid shaped hip rafter roofs.
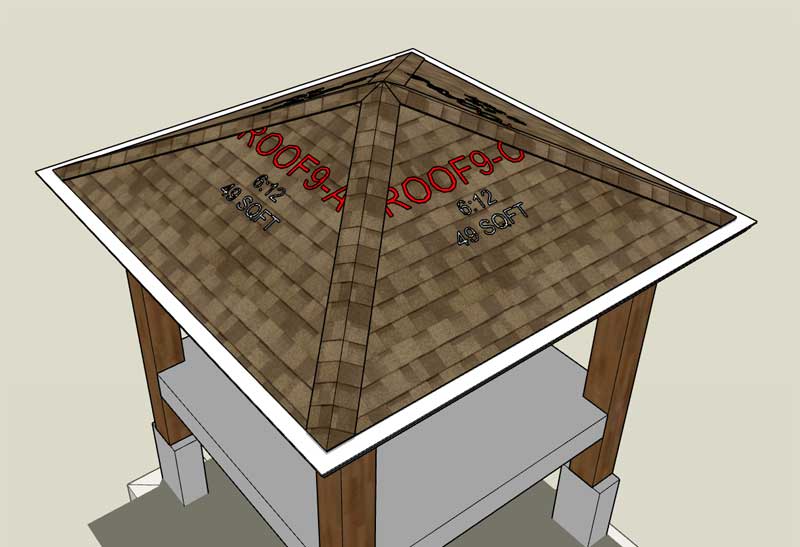
- Fixed a "rounding error" bug for pyramid shaped hip rafter roofs.
#709
Medeek Foundation Plugin / Re: Development and Updates for the Medeek Foundation Plugin
October 22, 2020, 10:10:21 PM
Version 1.6.3 - 10.22.2020
- Fixed a bug in the strip footing "Outline" edit menu.
- Fixed a bug in the strip footing "Outline" edit menu.
#710
Medeek Electrical Plugin / Re: Development and Updates for the Medeek Electrical Plugin
October 22, 2020, 02:28:11 PM
Version 1.2.4 - 10.22.2020
- Added outlets and switches to the Medeek Electrical Estimator.
- Added outlets and switches to the Medeek Electrical Estimator.
#711
Medeek Electrical Plugin / Re: Development and Updates for the Medeek Electrical Plugin
October 21, 2020, 09:54:00 AM
In the example shown below I've color coded my network cables based on whether they service the first or second floor of the building. The red cable is the designated switch-to-switch or router-switch cabling:


Note that the totals allows me to determine my cable amounts for each floor. I'm also able to determine that each cable run does not exceed a max. length.
View model here:
https://3dwarehouse.sketchup.com/model/ba4a8a90-9eb1-41c8-8e8c-b6b72723dfce/Network-Cables-Example-1
Once I created all of my cable paths I dropped them onto a separate layer so I could easily hide them (and keep them around for future use if needed) once my wires were created.
#712
Medeek Electrical Plugin / Re: Development and Updates for the Medeek Electrical Plugin
October 21, 2020, 09:04:59 AM
Note that the Wire Name can be customized by the user. The default is to assign a prefix and then a number that is auto incremented within the model, however one could easily use the name to define the location of the wire run (ie. Master Bath Light, Hall Chandelier etc...)
Besides regular power wires this could be useful for routing and planning network cable runs for a project. In this scenario all of the cables my be CAT6 or CAT7 but one could define a number of cable types and differentiate them by color. Then it would easy to categorize certain parts of the network by color of the network cables and also figure out how much cabling is required for specific parts of the network.
Besides regular power wires this could be useful for routing and planning network cable runs for a project. In this scenario all of the cables my be CAT6 or CAT7 but one could define a number of cable types and differentiate them by color. Then it would easy to categorize certain parts of the network by color of the network cables and also figure out how much cabling is required for specific parts of the network.
#713
Medeek Electrical Plugin / Re: Development and Updates for the Medeek Electrical Plugin
October 20, 2020, 04:53:38 PM
Version 1.2.3 - 10.20.2020
- Created the initial framework of the Medeek Electrical Estimating Module.
- Added wiring to the Medeek Electrical Estimator.
- Added the ability to export data from the Medeek Electrical Estimator in CSV format.
I also need to figure out what sort of CSI numbering to assign electrical components.
- Created the initial framework of the Medeek Electrical Estimating Module.
- Added wiring to the Medeek Electrical Estimator.
- Added the ability to export data from the Medeek Electrical Estimator in CSV format.
I also need to figure out what sort of CSI numbering to assign electrical components.
#714
Medeek Electrical Plugin / Re: Development and Updates for the Medeek Electrical Plugin
October 20, 2020, 01:43:21 PM
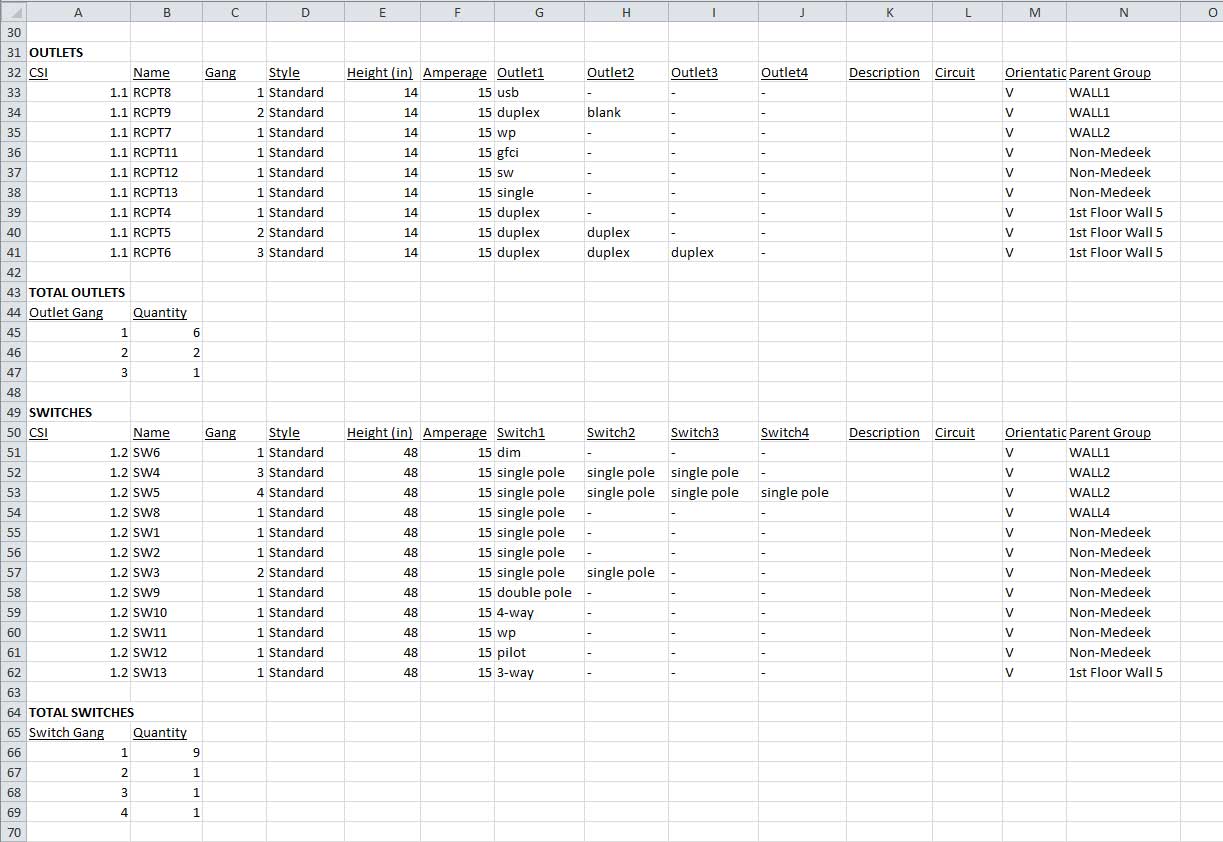
First look at the CSV output (imported into Excel) for the Electrical Estimator:

*Note, the additional formatting (column spacing, bold, underline) is done in Excel after the import.
Also note that I have the total lengths tallied for each wire type.
*Note, the additional formatting (column spacing, bold, underline) is done in Excel after the import.
Also note that I have the total lengths tallied for each wire type.
#715
Medeek Wall Plugin / Re: Development and Updates for the Medeek Wall Plugin
October 18, 2020, 03:01:25 PM
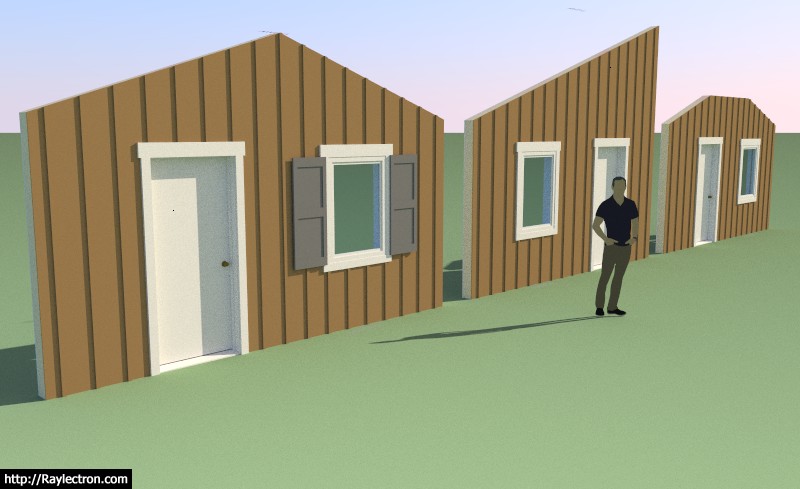
Another view of board and battens:

Just over five years into programming these plugins, I released the first version of the Truss plugin Oct. 7, 2015.
The further I go it seems like I just keep coming up with more things "todo". I really need to take myself and clone me about five times and then set each clone at developing the various plugins, maybe then I might get somewhere with all of this.
#716
Medeek Electrical Plugin / Re: Development and Updates for the Medeek Electrical Plugin
October 18, 2020, 02:48:32 PM
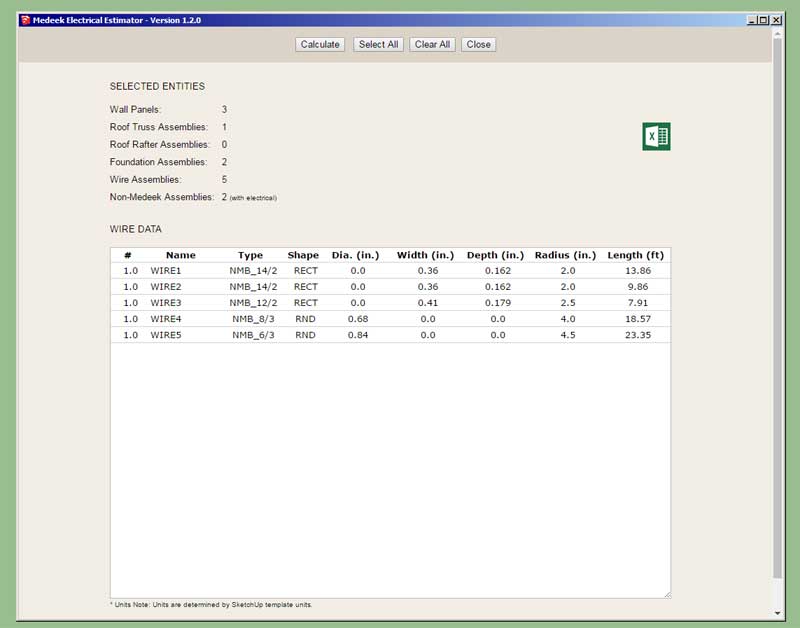
Similar to the estimator found in the Wall plugin the user will be able to select "All" or a selection of assemblies to run the estimator on:

The non-Medeek wall and roof assemblies will also be selectable since the Electrical plugin also works with non-Medeek walls, roofs etc...
I don't feel like it is necessary to break the listings into the assemblies they are part of however I will include a column in each table which lists the main assembly the electrical component is found in, this should prove useful to some.
There are a lot of little details with regards to different electrical components (ie. outlets, switches, panels etc...) Each type of electrical component has unique characteristics, all of this data needs to be output by the Electrical Estimator, it will probably take me a few days to assemble this new module.
Once it is complete it will make this plugin a much more useful tool.
P.S. I think it would be also quite useful at some point to incorporate a price database that works with the estimating module. This separate database would be referenced to determine the price, vendor etc... for a given electrical component. Additionally, the list of materials could then be conveniently broken into separate purchase orders for each vendor. I'm probably getting a bit ahead of myself here but with the ability to program just about anything with the API and the Ruby back end its conceivable that one could generate PO's that could then easily be imported into Quickbooks or any other accounting software. I've done a bit of Quickbooks API programming in the past where I integrated my own customer billing system and expense database with the software, its really not that hard to do.
When I ran my web hosting company back in the early 2000's I got really sick of having to manually enter in customer orders and business expenses into Quickbooks, the problem was my billing system and Quickbooks (my accounting system) were completely two different ecosystems. I would usually have to devote one entire day out of the month for this tedious task. I finally got smart one day and decided it would be really nice if I could somehow automate this process. After about two days of programming I had fully automated the manual entry problem and set it up as Chron job that would run nightly, it would even shoot me out an automatic email every morning letting me know how the process went and if there were any issues.
"Laziness is the mother of invention"
#717
Medeek Wall Plugin / Re: Development and Updates for the Medeek Wall Plugin
October 17, 2020, 03:24:18 PM
Version 1.6.9 - 10.17.2020
- Added the ability to create custom "Board and Batten" wall cladding materials within the Material Library.
- Enabled "3D" Board and Batten wall cladding for all wall types: Rectangular, Gable, Shed and Hip.
For the plugin to recognize the wall cladding material as a "board and batten" material is must be in this format:
battens_{decimal value}_{decimal value}_{decimal_value}
The three values are: batten spacing, batten width, batten depth respectively.
There should be no white spaces inserted into the name, only the underscore character in three places as shown.
#718
Medeek Wall Plugin / Re: Development and Updates for the Medeek Wall Plugin
October 17, 2020, 11:43:40 AM
Texture vs. 3D Battens:

Personally I prefer the texture myself, lower poly and it looks just as good or better than the real deal.
Personally I prefer the texture myself, lower poly and it looks just as good or better than the real deal.
#719
Medeek Wall Plugin / Re: Development and Updates for the Medeek Wall Plugin
October 17, 2020, 11:21:34 AM
Some more screenshots of battens:


*Notice the format of the batten material and its three numeric values within the name of the material.
*Notice the format of the batten material and its three numeric values within the name of the material.
#720
Medeek Wall Plugin / Re: Development and Updates for the Medeek Wall Plugin
October 16, 2020, 10:24:55 PM
First look at a 3D batten cladding on rectangular walls:

View model here:
https://3dwarehouse.sketchup.com/model/5e43daf3-c604-49b7-82d6-95dfbc76563c/Batten-Test-1
View model here:
https://3dwarehouse.sketchup.com/model/5e43daf3-c604-49b7-82d6-95dfbc76563c/Batten-Test-1