News:

SMF - Just Installed!

Main Menu
Menu

Show posts

This section allows you to view all posts made by this member. Note that you can only see posts made in areas you currently have access to.

Show posts Menu

Messages - Medeek

#1111
Version 1.1.3 - 09.23.2019
- Fixed a bug with the placement of Simpson's DTT2Z holdown and replaced included component with a low poly version.
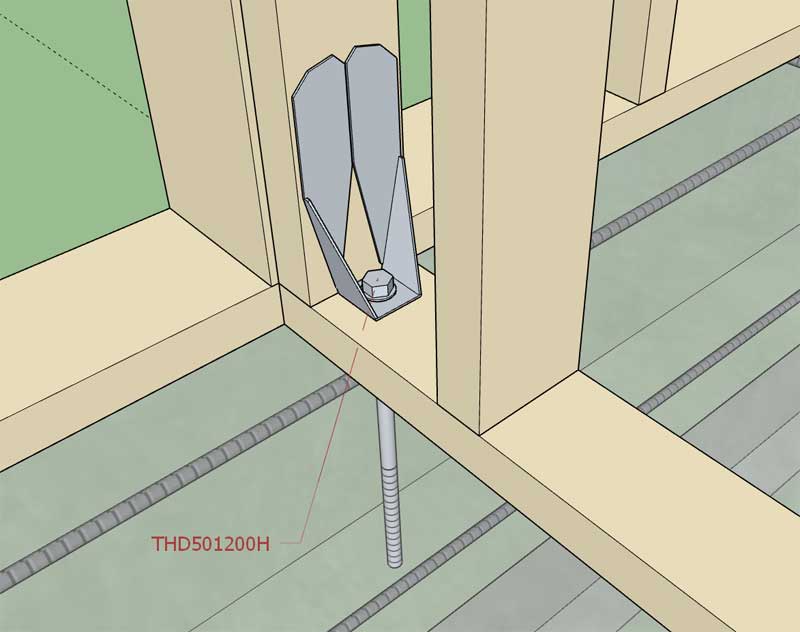
- Added the option for Titen HD holdown anchor bolts: THD50500H, THD50600H, THD50800H, THD501200H, THD501400H, THD501500H.

#1112
This particular design for a storage unit was originally created by me about four years ago for a local client here in Western Washington.  I had another purchase of this planset from my website and the customer requested that I also provide the 3D model so I thought this might be a good opportunity to test out the plugins and see what difficulties I would encounter with a fairly simple but large model:


Framing:


Wall Framing and Foundation:


The floor plan (originally drawn in AutoCad):


View model here:

https://3dwarehouse.sketchup.com/model/11cf8d48-a861-4887-b7b5-3dc26a09772c/MEDEEK-STORAGE8443

This planset can be purchased here:  http://design.medeek.com/plans/search.pl

Overall the process of creating the model went quite smoothly, I was pleasantly surprised.  However I did note a few things:

1.)  When you have a large wall and are putting an excessive amount of doors or windows into it the regen time starts to become noticeable.  Not sure what the fix is here but I will give it some thought.

2.)  With extremely large truss assemblies it may be advantageous to turn off the metal connector plates, the model gets a bit heavy and regen times are also affected.

3.)  I need to add in more light fixtures (ie. external wall packs)

4.)  There is currently no way to add a vent or window into a gable truss.  This had to be done manually.

5.)  The Simpson holdown DTT2Z was not being properly rotated, additionally I needed to utilized a Titen HD bolt in this model, I will address that this evening and release and update of the Wall plugin shortly.

6.)  Anchor bolts typically need to be manually moved around and deleted.  It would be nice to figure out a way for the plugin to preserve the manual manipulations even with a regen when the assembly is edited.

7.)  I don't have a way to deal with two wall intersecting each other in a "CROSS", in the model I simply had them pass through each other.  I will need to give this some further thought.

8.)  I don't like the way I am creating/managing the components for slab reinforcement (mesh or rebar).  I will need to change this up slightly.  It works but performance suffers on large SOG foundations.

9.)  Obviously I need to spend some time further integrating the estimating module, that would be really nice for generating a materials list.

10.) The parametrics of all of the plugins is really nice and to be honest, essential. 

11.)  I manually copied over some more gutter downspouts since I need more for this long gutter run.  By adding CUSTOM into the instance name I am able to maintain these additional downspouts even with a regen of the truss assembly.
#1113
First look at the Draw menu for a complex rafter roof:


When you first click the complex roof icon you are first presented with the initial selection menu:


Once you click the rafter roof option you are then given the draw menu.

I now have the initial supporting infrastructure and templates in place, in other words the boring stuff (ie. attribute library storage and retrieval, draw and edit menus, polygon tool for point selection, global settings).

Now begins the much more challenging and exciting part of the development, establishing the roof planes and the actual geometry creation algorithms.
#1114
Working in earnest on the complex roof module today after spending about two months overhauling the foundation plugin.

As I'm putting together this module I'm starting with a clean slate and trying to take advantage of all my behind the scenes and UI improvements I've made with the updates to foundation plugin and even the electrical plugin.  All of the menus for this module will be HTML.  Many of the editing and move tools will be brought over from the recent work on the foundation plugin.

The basic parameters that will define the complex roof overall geometry and roof planes are:

- polygon outline (provided by a face or a locus of user selected points)
- pitch
- overhang
- birdcut
- rafter depth

Additional basic parameters will be:

- rafter width
- ridgeboard depth
- ridgeboard width
- hip rafter depth
- hip rafter width
- valley rafter depth
- valley rafter width

- framing option: Yes/No
- advanced roof options

If the advanced roof options are enabled then the roof planes are actually further defined by the sub-fascia width since in two of three sub-fascia types the roof sheathing (plane) actually extends over the sub-fascia.

The advanced roof options will include:  sheathing, cladding, sub-fascia, hip-and-ridge, gutters and soffit & fascia.  The number of parameter required for all of these options is too numerous to list here.  Future advanced parameters might include: gypsum, ceiling joists, heel blocking

Once a complex roof assembly is created it then can be edited by selecting various roof planes and customizing that roof planes particular parameters. 

The roof plane edit tool will allow the user to adjust the follow parameters specifically for that roof plane or eave/edge:

- pitch
- birdcut
- rafter depth
- Overhang OR Delta Height (vertical height of supporting top plate)

Additionally certain roof planes will be convertable from a hip configuration to a gable configuration.  Once a roof edge/plane is converted to a gable it will then need to be editable with a different "gable" menu, which will include a whole host of gable specific parameters (ie. outlookers, gable overhang, wall sheathing, wall cladding etc...)

Similar to the "Move SOG Edge" tool with the foundation plugin I will also have a "Move Roof Eave" tool that allows the user to move the roof outline around by picking an edge and dragging it perpendicular in or out.  This should make resizing a roof a breeze. 

I will also have the "Edit Roof Outline" context menu tool which will allow the user to actually edit the polygon that defines the roof outline.

I'm posting this update not only for you but also for me as it is helping me organize some of my own thoughts about what direction I need to take this new development.  Any feedback or suggestions on what I have proposed thus far for this new module is very much welcomed.

Just to be clear this module is something I have been trying to accomplish within this plugin since I began coding it almost four years ago.  This is the Holy Grail of the Medeek Truss extension.  If I can pull this off successfully then I have actually accomplished something.
#1115
Version 1.5.1 - 09.20.2019
- Enabled CMU blocks for spread footing piers.


Under pier options you can select concrete or CMU block as the material type.  This update is per user request.

The CMU textures seems to work best with a 16" width (square) pier.  Currently rectangular piers are not an option but I may need to change that in the near future.

View model here:

https://3dwarehouse.sketchup.com/model/368d4ee9-afc1-4f07-8b18-c32104f671d7/CMU-Pier-with-Spread-Footing
#1116
When you throw brick ledges into the mix the horizontal surface texture doesn't really work well:


Maybe I just need to go with a more generic texture for these surfaces?

The model has a 12" CMU stemwall with a 4" brick ledge, yielding a single row of 8" block forming the final layer on the top of the wall.

View model here:

https://3dwarehouse.sketchup.com/model/faa957fe-8c20-479b-a2d2-e369f7c711f0/CMU-Stemwall-with-Brickledge
#1117
I am curious how to handle a situation where the brick ledge terminates along a linear stretch of stemwall?

Here I have a 10" stemwall with brickledge meeting a 6" stemwall without.  What is typically done in this situation?

#1118
Version 1.5.0 - 09.19.2019
- Added a brick ledge option for stemwall steps.
- Added a parameter which allows the lapping of brick ledges for the following stemwall step types: Top, Double.


Note that the "ledge lap" parameter does not apply to Bottom steps, the step shown in the middle of the image.

The lap distance can be set by the "Ledge Lap Distance" parameter independently of the ledge height.

View model here:

https://3dwarehouse.sketchup.com/model/5c0cb202-6b8a-4c92-b46c-84bd1c77ba64/Stemwall-Steps-with-Brickledge

I would really like to see someone use the extension to model up a fairly complex project (for construction) and get a little more feedback on the weaknesses and strengths of the plugin as it currently stands.
#1119
First look at stemwall steps with brick ledge (and insulation):


Now I just need to enable the "Ledge Lap" parameter which will allow for an overlapping of the brick ledge for Top and Double steps, obviously this does not apply for the Bottom step type.

I got back in from Utah just about a month ago.  In the last four weeks I've managed to make quite a dent in this plugin (15 major updates, version 1.3.5 thru 1.5.0).  I'm pretty excited with the way this plugin is finally taking shape, there is always more to do,  but it is beginning to feel like a much more useful extension now.
#1120
Version 1.4.9b - 09.19.2019
- Fixed a bug in the Layers tab of the Global Settings.

*** Critical Fix ***

This seemingly minor typo in the HTML prevents the user from saving their updated settings within the Layers tab of the global settings.  I highly recommend upgrading to version 1.4.9b in order to resolve this issue.

Versions 1.4.2 thru 1.4.9 are affected by this bug.
#1121
Now that I have stemwalls and brick ledges on my mind it seems clear that we probably need a brick ledge option for stemwall steps:


However, as I'm looking around at various examples of brick ledges combined with steps it appears that sometimes the brick ledge laps as shown in this image:


Do I need another parameter so that the designer can lap the brick ledge?

View model here:

https://3dwarehouse.sketchup.com/model/92137e0e-241e-405d-ba04-79fdc4dcbb0a/Stemwall-Step-with-Brick-Ledge
#1122
I think we are just about ready to fully retire the old stemwall tool.  The only thing I am missing with the new polyline tool is joist pockets, I guess there is always one more thing.

Joist pockets would be a feature that would be on a per edge basis.  Like brick ledges for slab-on-grades there would be no "move" function, only draw, edit and delete tools.  So essentially I need one more toolbar for joist pockets, with three icons... I know everyone is about ready to hit me right now, with all of these toolbars I keep adding, I'm sorry. 

In my defense though I should point out that the user can easily disable/turn off  any of the toolbars that they do not commonly use, so that they do not overly clutter their SketchUp workspace. 

Joist pockets are not a high priority in my opinion.  I have a few western US builders who use them on a regular basis but I don't think they are as popular anymore.  I'm going to put this option on the back burner for a while, however as they say the squeaky wheel gets the grease so I'm always open to suggestion if you feel otherwise.
#1123
Version 1.4.9 - 09.19.2019
- Added a brick ledge option for polyline stemwalls.
- Fixed a bug with regards to metric templates for foundation vents within polyline stemwalls.


Note that the top rebar is offset from the bottom rebar so that it stays centered within the decreased width of the upper stemwall.  Anchor bolt placement and FPSF insulation is also adjusted accordingly as shown.

The example shown is a 10" stemwall with a 4" brick ledge.

As previously discussed the brick ledge option is an assembly wide option and not on a per edge basis, hopefully this is flexible enough for most designers.
#1124
Here is a simple example of a stemwall foundation where the front of the house would have brick veneer and the rear and sides would be siding or stucco:


Notice how the dimensions for the sections of the walls that support the brick are thickened accordingly and the model splits the foundation into two separate stemwall assemblies to achieve this.

View model here:

https://3dwarehouse.sketchup.com/model/8aedbc2a-83f1-435b-a021-24ff99ab3c4c/Stemwall-Foundation-with-Brick-Ledges

In a situation like this one would not need brick ledges on a per edge basis since those stemwalls sections with brick would require a different (thicker/larger) profile to deal with the extra dead load of the veneer.

If there is a valid argument for a brick ledge tool that works on a per edge basis I will entertain it, but I need to see a situation where there would be call for this.
#1125
There is one final issue or missing feature with the polyline stemwall tool and that is brick ledges.  I have been working on the complex roof module this evening but I really feel like I need to address the brick ledge issue before I leave the foundation plugin development for a spell.

Originally my thinking was that a brick ledge option for stemwalls needed to be on a per edge basis.  However, even if this were the case the stemwall thickness and footing size would still remain the same for all of the assembly, even for those segments that do not have brick ledges.

Typically I would assume that a stemwall foundation should have a thicker stemwall and footing for those walls that are supporting brick veneer.  If this is the case then it actually makes more sense to have a global option for the assembly rather than a per edge basis.

Please correct me if I am wrong here.

I guess I need a bit of guidance, perhaps some more more examples of stemwall foundation plans with brick ledges (and some walls without) would be extremely helpful.